Full-Body Alternating Failure Training
Build size and strength one limb at a time with this 5-day unilateral lifting program.

Build size and strength one limb at a time with this 5-day unilateral lifting program.

The last three weeks I did my APRE Strength Challenge program , and soon I'll be doing the 6-week New Year's Challenge program right alongside you.
In the meantime – the one week between "Challenges" – I'll be doing this 5-day full-body unilateral program: Alternating Failure Training.
Sound familiar? This program is similar to Alternating Rest-Pause – you'll be going back and forth from one side to the other without resting – only with a different rep scheme and all sets taken to failure. What the two programs have in common are the results: more muscle and more strength!
Unilateral training – during which each arm or leg is trained on its own, as opposed to bilateral training with, say, a barbell – is a concept I'm always rotating into my training. The benefits are numerous.
First of all, it helps eliminate muscle imbalances from side to side. When you train bilaterally, whether you realize it or not, your stronger arm or leg is compensating for your weaker side. When this happens, the weaker arm or leg stays weak and the stronger one stays strong. When you train unilaterally, the weaker limb is forced to move the weight on its own, with no help from the stronger arm or leg. This is how you bring up the weaker side so that eventually you have equal strength from right to left.
Another benefit is greater strength – the ability to move more total weight. Here's what I mean: When you train one arm or leg at a time, you're stronger than you are when you use two arms. That is, when you perform single-arm exercises like a one-arm dumbbell curl, you're able to curl more than half the weight than you can do for both arms. For example, if you can curl 80 pounds bilaterally, you should be able to curl more than 40 pounds (i.e., 45 or 50 pounds) with one-arm curls. This will lead to greater gains in muscle strength, and you'll find that over time, you're able to lift more weight when you go back to bilateral training.
One other thing: These added benefits of promoting balance and increased strength with unilateral training don't have to be more time-consuming.
If you think these added benefits of better muscular balance and increased strength come with a greater time commitment, think again. Doing exercises one arm or one leg at a time will take you twice as long, right? Not the way I do it! Because one limb is resting while the other is working, there's really no need to take any rest. When training bilaterally, you typically do a set, then rest, then do another set, and so on. When training unilaterally, you do a set with the right side, then go immediately to the left side, then back to the right side, and so on, with no rest. The time it takes you to do, say, three sets of an exercise unilaterally is essentally the same as doing it bilaterally, even though you're technically doing twice as many reps.
With Alternating Rest-Pause, you started each exercise with a fairly heavy weight and did a 3-3-3-3-2-2-1 scheme. With Alternating Failure, you'll take each arm or leg to failure from the start, and then switch to the other side until you hit failure again. Then, with the same weight, you'll immediately switch back to the other arm (or leg) and do reps again to failure, then back to the other arm. Follow this order until you've competed 3 sets for each arm/leg, taking no rest other than what’s given while the opposite side is training.
What you'll find with the Alternating Failure technique is this: The rep counts will drop with every set, as each side is going to failure and only getting as much rest as it takes you to do reps on the opposite side; in other words, the muscle fatigue reduces the number of reps you can perform on subsequent sets for a given exercise. And of course, the fewer reps you do per set, the less rest each side gets. So as you alternate side-to-side on an exercise, both the reps and rest get shorter.
That’s why I typically recommend using this technique with higher reps on set #1, typically 12-15 reps. You don’t want to go much higher on reps or the weight will be too light and rest periods will be too long. But you also don’t want to go too low on reps, or the weight will quickly get too heavy and rest periods will be too short to allow for adequate recovery.
But don’t just take my word for it – I want you to experience it yourself...
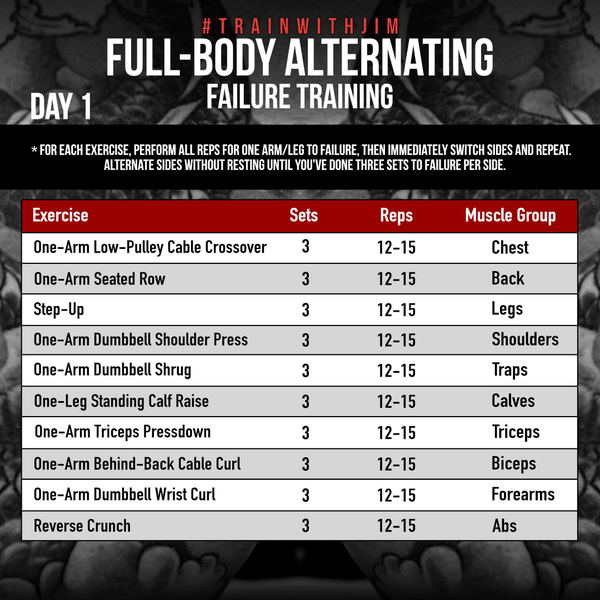
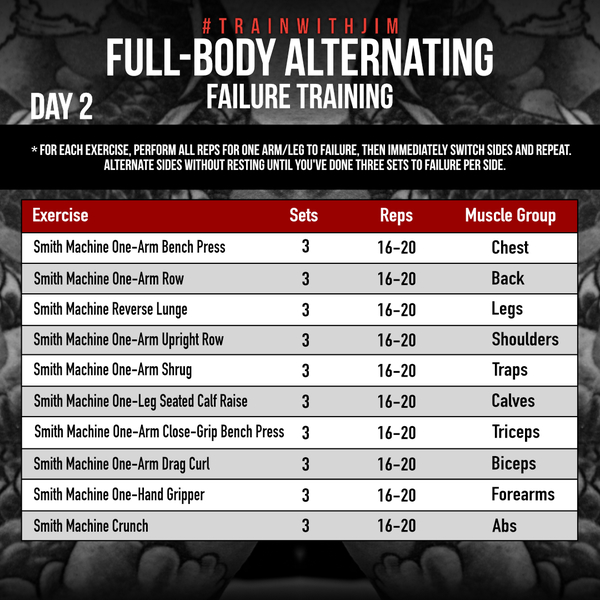
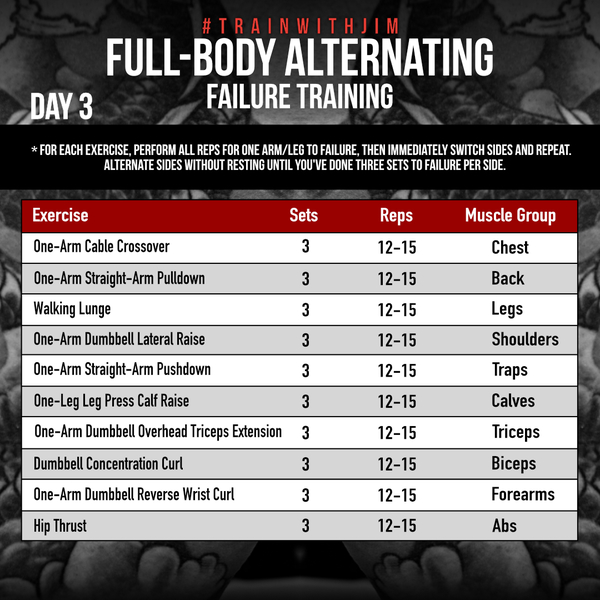
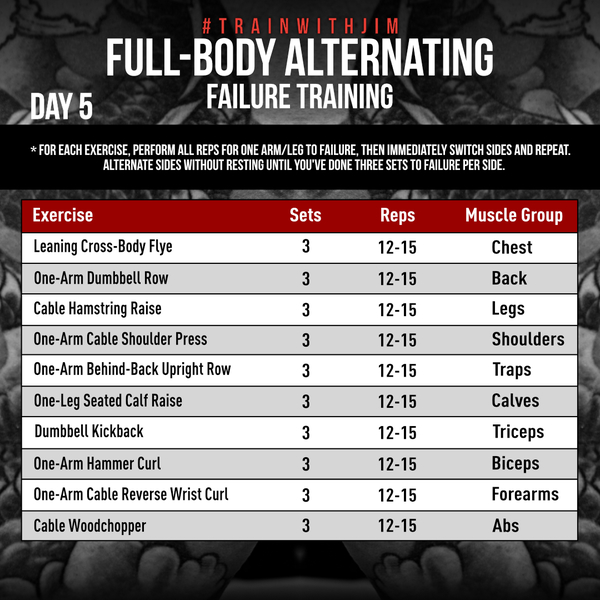
Below are the five full-body workouts you'll be doing in the Alternating Failure program. In Workout 1, you'll use my recommended 12-15 reps per set. Workout 2, however, bumps reps up to 16-20 per set so that you feel what longer rest periods allow for reps on all three sets. In Workout 3, we go back to the 12-15-rep range. Then, in Workout 4, weight jumps up and reps drop down to just 6-8 on set #1; this will allow you to feel the difference with lower rest periods and heavier weight. Then, the fifth and final workout moves the rep range back to my recommended 12-15 per set.
Keep in mind, these rep ranges only apply to the first set of each exercise. Because you're taking each set to failure, the number of reps you're able to complete will drop immediately after set #1. If you hit failure on, say, 12 reps on the first set of a given exercise for each arm or leg, on set #2 you may only get 9 or 10 reps, and on set #3 the reps may drop to 5 or 6. Point being, don't think you have to hit the prescribed rep range on every set – just on set #1 of each exercise.

Related Articles

This 4-week Full-Split program adds a new degree of fat-burning – via full-body training – to the classic Shortcut to Size template.

This updated version of a classic Joe Weider full-body workout will enhance size, strength, and conditioning and promote better recovery.

This 4-week training plan will torch body fat... fast.

A guide to the best men’s workout schedule to build muscle, burn fat, and stay fit.
Foundations

Featured Meal Plans

Muscle Hypertrophy: Build Muscle Fast

Rethink Your Rep Range

The Science of Strength Bands
Training
Nutrition
Supplementation
Health