Bench Press Key Points
-
The barbell bench press is a foundational exercise for both building and measuring upper-body pushing strength. It's also one of the best muscle-building exercises for the chest muscles (pecs), with the shoulders (deltoids) and triceps being secondary movers and also getting some mass-gaining benefits from benching.
-
When I teach proper bench press technique, I focus on "5 Points of Contact" – feet, glutes, upper back/shoulders, head, and hands. If these body parts are following proper protocol, you're setting yourself up for a stronger bench press that builds maximum muscle and minimizes injury risk.
Few, if any, gym lifts get more attention (at least by guys) than the traditional barbell bench press. Some people would say the bench press gets too much attention, but either way, it's still a great exercise for increasing muscle size and strength in the upper body "pushing" muscles – especially the chest. If done improperly, though, the bench press can wreak havoc on the shoulder joints. In this Master Class, I'm going to teach you how to get all the size and strengths gains of the barbell bench press while minimizing injury risk.
How to Bench Press
A more detailed description of the bench press technique is covered below in the 5 Points of Contact section, but this condensed description will provide a good overview before we get into all the finer points of the move.
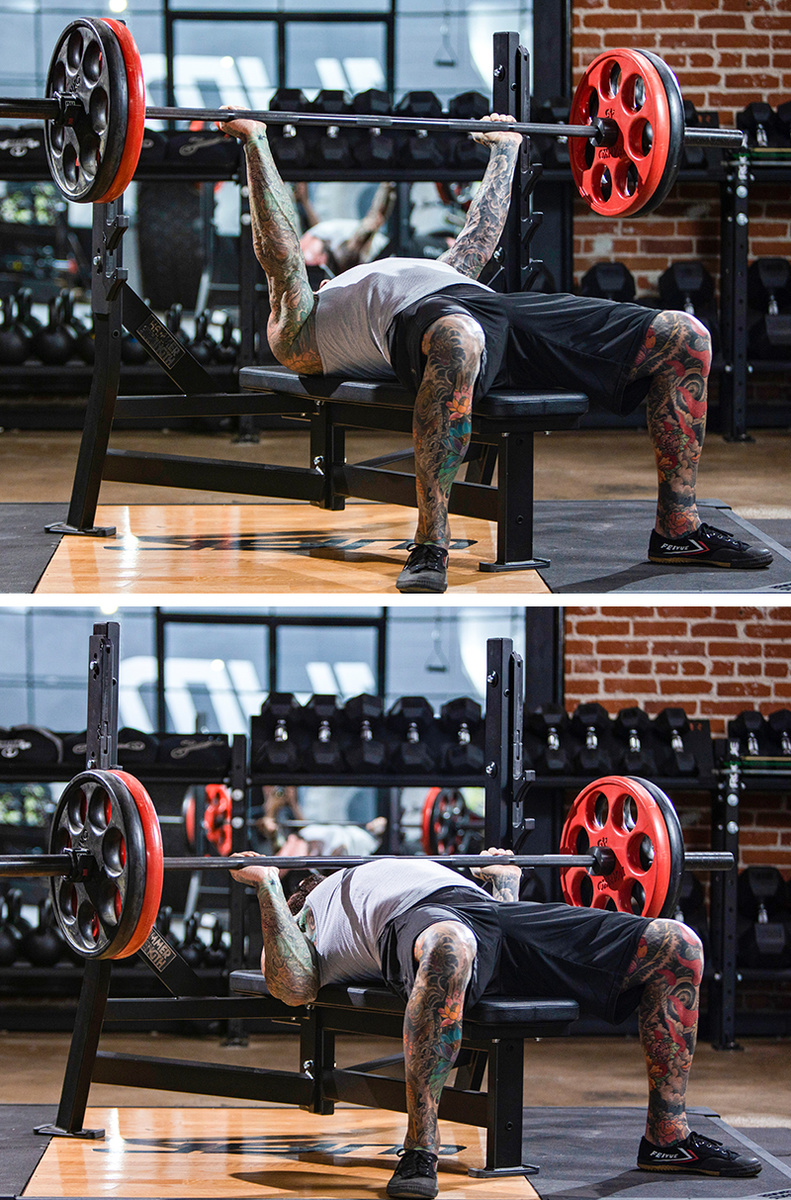
- Lie back on a flat bench with a rack, placing your feet flat on the floor.
- Grasp the bar with a grip width in accordance to your biacromial distance (see below under "Hands" in the 5 Points of Contact), carefully unrack the bar and begin with it directly over your upper pecs with your arms extended.
- Bend your elbows to slowly lower the bar toward your lower chest. Your elbows should be pointed forward with your upper arms at around a 45-degree angle to your torso. Keep both the back of your head and your glutes in contact the bench the entire time.
- Touch your chest lightly with the bar, then press it back up in a slight backward arcing motion so the bar ends up over your upper chest with your arms extended but not locked out.
What does Bench Press work?
The main muscles involved in the bench press are, first and foremost, the pectoralis major of the chest. The secondary muscles involved are the deltoids (front and middle delts) and triceps. Doing the barbell bench press on a regular basis will both strengthen and add size to all three of these muscle groups.
With the bench press, different phases of the movement target the aforementioned muscles differently. In roughly the bottom-third of the movement (from touching your chest to about 1/3 of the way up), you're getting maximum involvement from the pecs. In the second third of the movement, the shoulders are more heavily involved. And then, in the very top third, particularly when you're locking out your elbows, the triceps take over.
As you'll see below in the 5 Points of Contact section, however, there are a number of other muscles involved in pressing a bar off your chest – even the lower body! I wouldn't go so far as to say that the bench press is a full-body exercise (as I might say for the squat and deadlift), but it certainly brings in more muscles than just the chest, shoulders, and triceps. Aside from the legs pressing off the floor in a powerlifting-style bench press, the muscles of the core are engaged when benching, and the back muscles play a major role in stabilizing the torso.
How to Properly Bench Press – 5 Points of Contact
One of the biggest misconceptions about the bench press is that it’s a “dangerous” exercise. Sure, if you do it improperly, you could get hurt. But you can get hurt crossing the street if you don’t pay attention to the crosswalk lights and oncoming traffic.
The bench press is no more dangerous than any other upper-body pressing exercise you do with dumbbells or even a machine. There are ways to do things dangerously and there are ways to do them safely.
When it comes to bench pressing safely, follow the below “5 Points of Contact” and you’ll be poised to make great gains in upper-body size and pressing strength, minus the injuries.
1) Feet
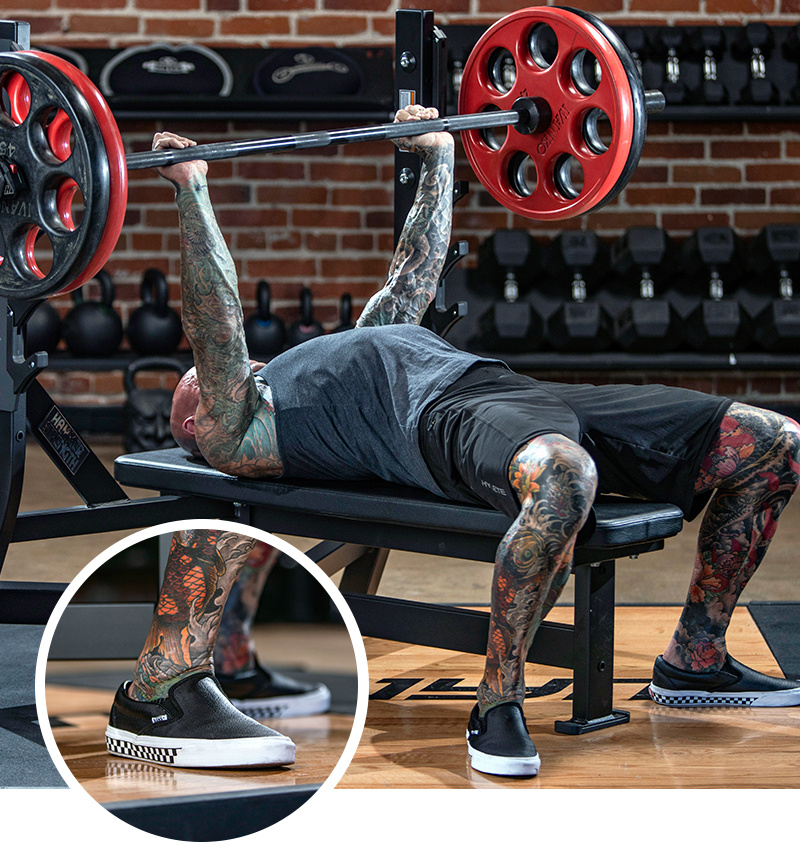
Your first point of contact on the bench press isn’t your hands on the bar – it’s your feet to the ground.
If you’re wondering what your feet have to do with a bench press, the next time you train, try to do the exercise with your feet up off the ground and your knees bent like some people do on crunches. Trust me, you won’t be nearly as strong this way, because not having a solid base beneath will rob you of power and strength, even in the upper body. The force you produce to press the bar up is not just coming from the chest, shoulders, and triceps. Force is distributed throughout the body, moving from your feet, through your legs and hips, through the spine, and up to your shoulders and arms.
So where should your feet be? Most people say they should be flat on the floor beneath you, and this advice would seem to make sense for having a solid base. But if you really want to maximize your strength and power and push as much as weight as possible, you need to move your feet back as far as possible, somewhere below your mid-thighs or even your hips.
As for keeping your feet flat on the floor versus heels up, this depends on the length of your legs and the height of the bench. If you have long legs and/or the bench is relatively close to the ground, you’ll probably want to keep your heels on the floor; this is how I do it on the bench press station at my gym.
Point of Contact Take-Home Tip: Pull your feet back on the floor.
2) Glutes
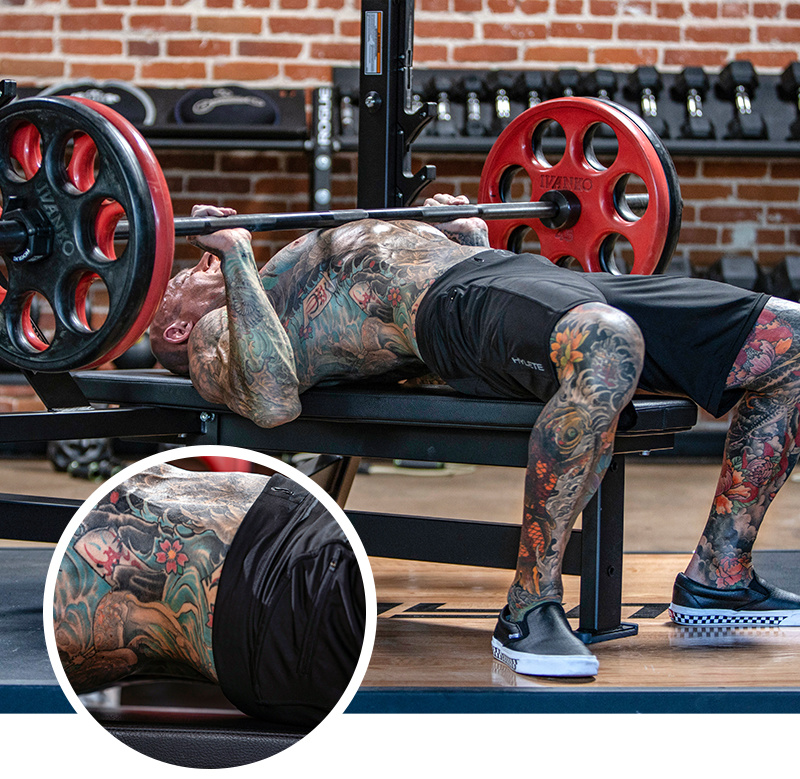
After your feet are set as far back as possible, your next point of contact is the glutes. This is a very important element of the bench press, and the key is this: Your glutes should be in contact with the bench the entire time, with your lower back NOT in contact.
You should have an arch in your lower back at all times when doing the bench press. There should be a space created so that someone could slide a hand freely between your lower back and bench. This arch will not only help protect your lower back, but it will also provide a more stable abdominal and spinal area from which to press from, thus maximizing pressing strength.
Powerlifters, in fact, really exaggerate the arch to raise the torso that much more off the bench and literally create a shorter range of motion. But if you’re not competing in the bench press, you don’t need to exaggerate the arch; a more natural arch should suffice.
One of the major mistakes people make when benching is to arch the back so much that the butt (glutes) comes off the bench. This is a huge error! Keep the glutes in contact the entire time.
Point of Contact Take-Home Tip: Keep your butt in contact with the bench and your lower back arched.
3) Upper Back/Shoulders
Up from the glutes, the next major contact point on the bench itself is the upper back and posterior shoulders. The first thing to focus on here is to really pull the shoulder blades down into the bench. You can also think of this as pulling the shoulder blades back and together; I just say down because I’m lying faceup, but same thing.
What you don’t want to do is make the common mistake of pushing the shoulders up toward the ceiling (shoulder girdle protraction) at the top of the rep, thinking that’s helping you achieve a full range of motion. That’s not part of the bench press, so keep those shoulders pulled down even at the top. This may look like only a partial range of motion, but it’s actually a full range for the pecs and is promoting maximum involvement.
One technique cue is to imagine you’re holding grapefruits in your armpits, and you don’t want to let them fall to the floor. This visualization will help you keep your shoulders down and back, and it will also cue you to keep your elbows in instead of flared out. This is crucial, as flaring out the elbows opens you up to shoulder injuries (namely, rotator cuff issues). Not to mention, the elbows in closer to your sides is a more powerful pressing position.
Point of Contact Take-Home Tip: Keep your shoulder blades pulled back and together throughout and your elbows tucked in.
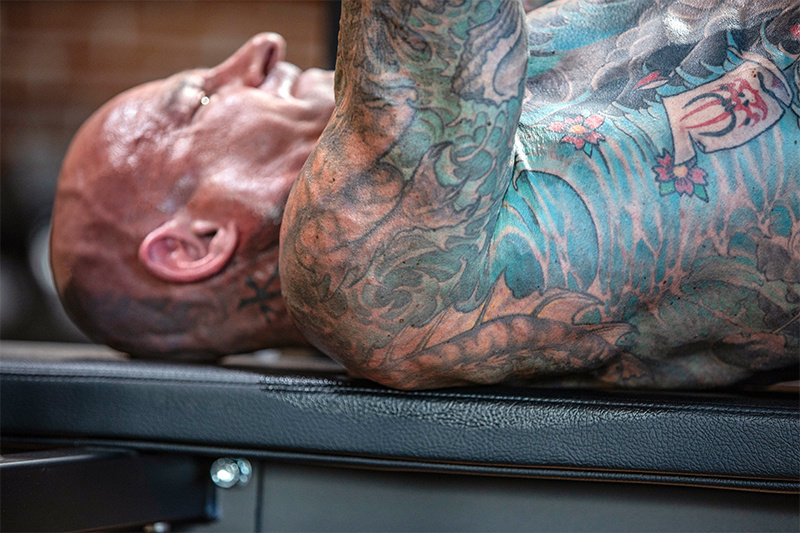
4) Head
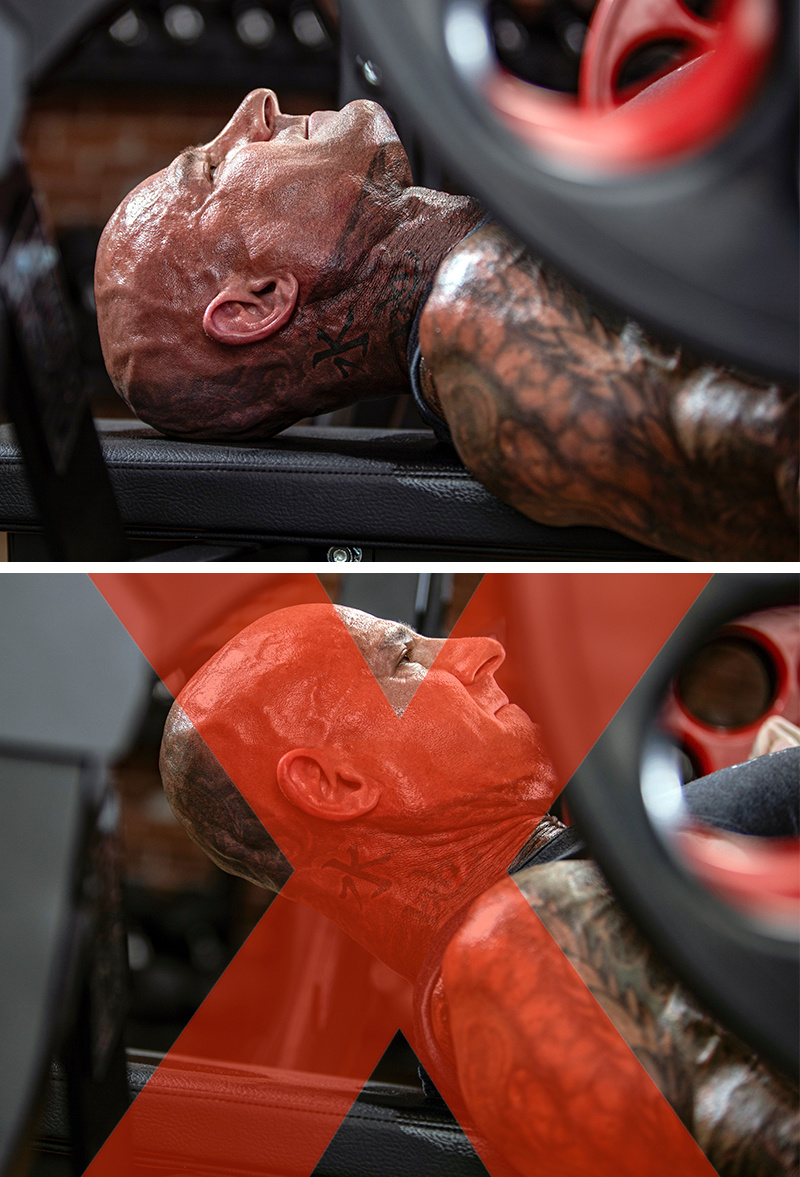
After the glutes, upper back, and shoulders, the last body part to contact the bench is the head. The message here is simple: Keep the back of your head touching the bench the entire time. The most common mistake people make when benching is lifting the head up, usually to watch the bar travel down to the chest. This is the worst thing you can do! It’s terrible for the health of your spine, and it also decreases your strength by as much as 10% (according to research).
Flexing your spine while handling a load is never a good idea, even when you’re lying down on a bench and holding a weight in your arms. You can pinch a nerve doing this or damage a disc. This is a major contributor for lifters having neck surgery.
So, don’t try and keep an eye on the bar as it goes down to your chest. If anything, push your head back into the bench a bit when doing the lift; this has been shown to increase pressing strength.
Point of Contact Take-Home Tip: Keep the back of your head in contact with the bench at all times.
5) Hands
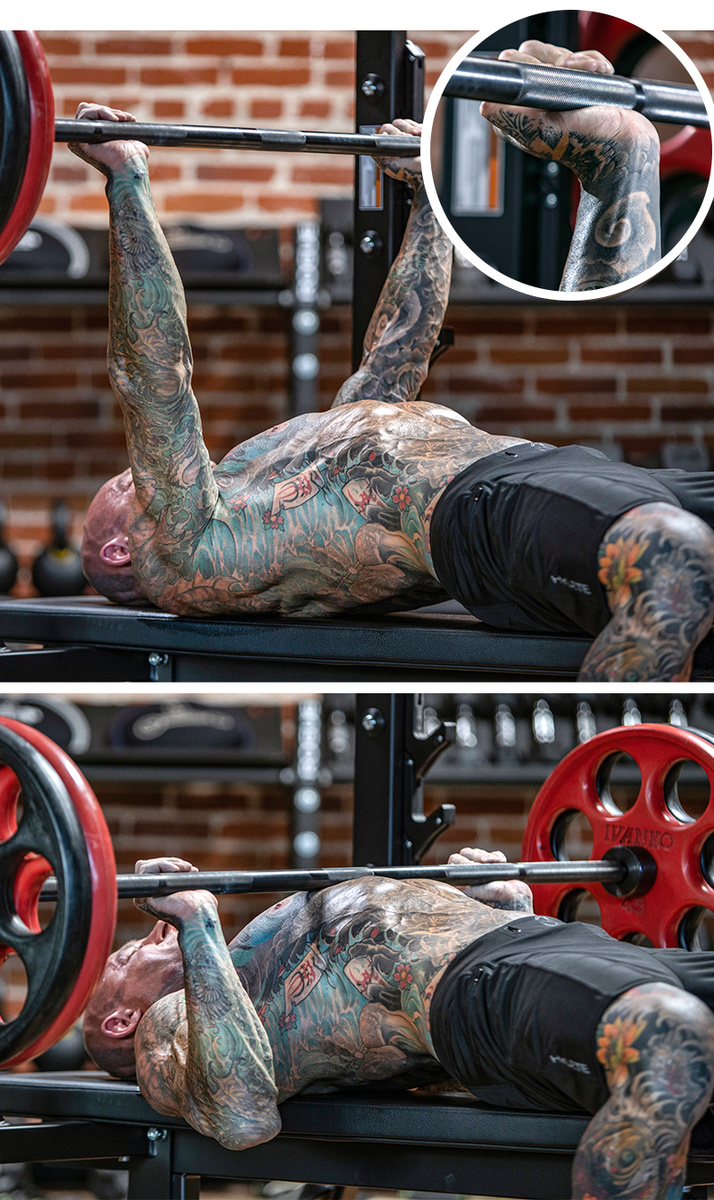
The last contact point is also the most controversial. Your hands are what physically connects you to the bar, but it’s not just a matter of “grip it and rip it.” The type of grip you take and the width of your hands on the bar are both hugely important to maximizing power and strength and keeping the lift safe.
First off, I’m a huge proponent of using an open grip, where the thumbs are NOT wrapped around the bar, but rather on the same side of it as your fingers. I like the open grip because of the force transfer it provides.
If you use a closed grip (with the thumb wrapped around the bar), the bar will naturally be pushed further up the palm; it has no choice because the thumb is in the way. When this happens, the wrist is extended to a greater degree. This doesn’t make for a very strong transfer of force because the load technically has to go through that extended wrist before moving up the forearm.
If I use an open grip, however, the bar can sit higher up on the palm, that much closer to the forearm and thus creating a more direct transfer of force. Think about it: With the bar higher up on the palm, the wrist is sort of flopping up and down, which is not a strong place to be pressing from so close to the bar. With the open grip, the bar is virtually right on top of the forearm and minimizing the wrist involvement. That’s a much stronger position.
The open grip also allows you to better tuck the elbows in than does a closed grip, since you’re able to turn your hands in easier to shift your arms in. Wrapping the thumb around the bar instinctively causes the elbow to flare out slightly.
Is an open grip more dangerous than a closed grip? Yes. With the thumb wrapped, the bar is less likely to slip off your hand and fall to your chest. But as you get stronger and get used to the open grip, you’ll find that you’re able to keep the bar in place without issue. The face of the matter is, you’re stronger and can press more weight with an open grip versus a closed grip.
The other topic with the hands deals with grip width. How wide should you have your hands on the bar? Opinions differ on this, but I prefer to use a formula to determine the biacromial distance, the best grip width for maximizing power and strength and reducing shoulder injury risk. If you go too wide, it will flare your elbows out, and you don’t want that.
Here’s how it works…
You have protruding bumps on either side of your shoulders called the acromion processes. The distance between these bumps is your biacromial distance. Mine, for example, is 14 inches.
Take the biacromial distance and multiple it by 1.5, and that's your ideal bench press grip width. In my case, it's 21 inches.
So, when I do the bench press, that's how far apart I space my hands. From the middle of the bar, I'll measure out 10.5 inches to each side, and that's where my thumbs will hit (not my pinkies).
That’s all there is to determining your proper grip width – a simple formula:
Biacromial Distance x 1.5 = Ideal Bench Press Grip Width
Point of Contact Take-Home Tip: Use an open grip and the biacromial distance for hand spacing to maximal bench press strength.
How to Increase Bench Press Focus on the Pecs – Shortening the Range of Motion
When doing the bench press for developing and testing overall upper body strength, you'll want to use a full range of motion – touching the bar to your chest at the bottom, and locking out the elbows at the top. But when you want focus solely on building size in the pecs, stopping short of a full motion at the top can help.
As I mentioned above in the Anatomy section, your pec muscles are involved the most in the bottom third (or so) of each rep. By the top of the movement, the triceps are starting to take more of the brunt of the load, and the delts play a large role in the middle third of the range of motion. That said, if you want to focus on the pecs, there's really no need to go all the way up on the bench press to where you're locking out at the top. Instead, stop about halfway to two-thirds of the way up.
In this video, I show you what these "partial reps" look like:
Smith Machine Bench Press for Greater Pec Involvement
The Smith machine bench press is a common exercise variation for people who would rather not do the movement with a barbell. Why might someone prefer Smith machine bench to barbell bench? Any number of reasons: Training alone and don't have a spotter, feeling that the Smith machine is safer than a barbell, being intimidated by the barbell bench press, just for variety's sake, and so on.
Many trainers, however, frown upon doing any foundational lift with a Smith machine, arguing that it's not "functional" and doesn't sufficiently train important stabilizer muscles. My opinion is that the Smith machine bench press ertaintly has it's place in a well-rounded training program.
First of all, the aforementioned trainers are right – the Smith machine bench press doesn't train stabilizers to the extent of the barbell bench press. But that's actually the benefit of the Smith machine bench press! Specifically, the Smith machine bench press involves less of the deltoids (namely, the middle and front delts) than the barbell bench press. It focuses more on the pecs, which is typically the muscle group people are interested in when benching. If your goal is to build a bigger chest, the Smith machine is a great tool to utilize.
Does this mean you should substitute Smith machine bench press for barbell bench press exclusively? No, it just means you should rotate both variations into your program if building size in the chest is important to you. That said, if your primary goal is to maximize bench pressing strength (ie, your 1RM on bench press), then definitely focus more on the barbell version.
I explain the Smith machine versus barbell bench press difference in this video:
Bench Press in Action
Find bench press on Day 1 (chest and abs) of all four weeks of my Fail No Fail program, as well as MANY other programs here on JimStoppani.com.
GET MY SHORTCUT TO SHRED WORKOUT
Related Articles