Push-Up Master Class
Enhance upper-body development and endurance with this classic military exercise that's often performed incorrectly.

Enhance upper-body development and endurance with this classic military exercise that's often performed incorrectly.

Note: I'll be adding exercise photos to this article in the coming days to illustrate the different variations I cover in this Master Class. Until I get those photos shot, edited, and loaded into the article, reference the above video for images and demonstrations.
The classic push-up is one of the most fundamental, and arguably the most widely known, resistance-training exercises of all time. It’s about as basic as exercises come, but people still do push-ups incorrectly ALL THE TIME.
(Quick historical fact: The term “push-up” dates back to 1905, yet it’s safe to say people were doing this movement long before that. For more historical information on the push-up, including how it’s used in the military and law enforcement, watch the above video, starting at around the 3:00 mark.)
In this Master Class, I’m going to break down everything you need to know to do push-ups correctly for maximal chest, shoulder, triceps, and even core development, as well as enhancing strength-endurance.
If you want to be at an advanced level of training, you need to master the basics first. When it comes to upper-body pushing/pressing movements, push-ups are the foundational exercise. Don’t ignore this move or take it for granted – master it!
The muscles worked on the push-up are pretty much the same as with a bench press or dumbbell press. We’re talking about the pecs (chest) primarily, with the deltoids (shoulders) also playing a major role, and then the triceps helping out as a secondary mover.
What makes push-ups a bit different than, say, dumbbell presses on a flat or incline bench, is the activity of the core. As I explain further in the next section, you’re basically holding a plank position while doing a push-up, making it very important to keep the core activated throughout each set. When you tighten the core the way you’re supposed to, your basic push-up becomes a very difficult exercise to perform for high reps.
Believe it or not, push-up form is essentially the same as it is on the bench press, even though the two exercises may appear to be very different. Here are the key technique cues for the push-up…
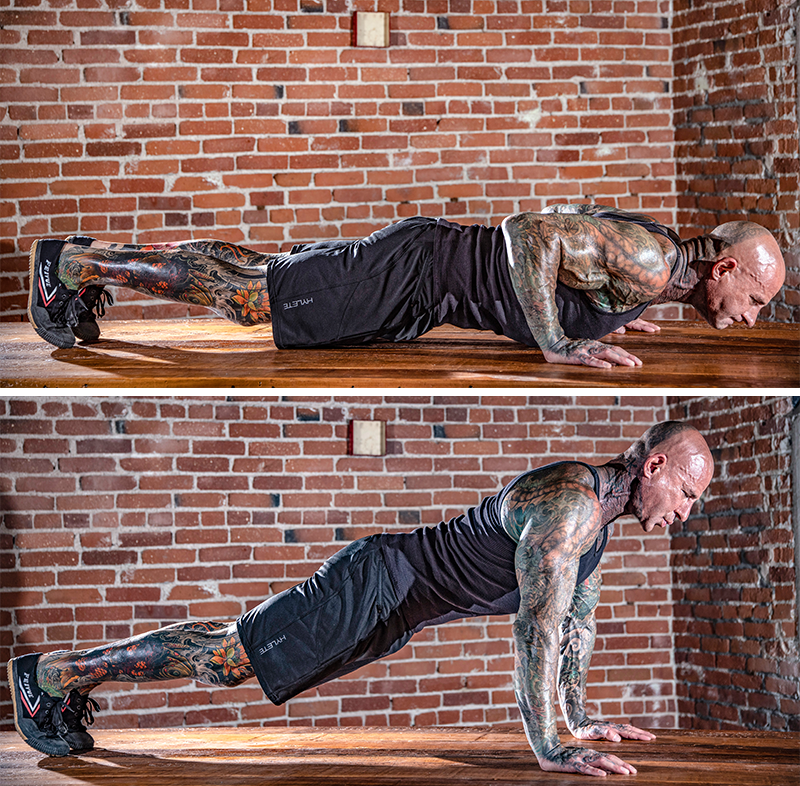
A vast majority of people start the push-up in the up position – after all, this is officially called the “push-up position.” But I prefer to start any set of push-ups in the down position, with my body resting on the floor.
Why do I do this? Because in the down position, it’s much easier to set your shoulders where they need to be. Just like with the bench press, or any upper body pressing move, it’s very important to keep your shoulder blades back while pressing up. And you want to pull your shoulder blades back before doing the press. As I just said, it’s easier to do this when your body is resting on the floor.
Your shoulder blades should stay back even when you get to the top position of the push-up. Don’t round your shoulders forward at the top. That would be shoulder protraction; you want retraction, meaning they’re pulled back.
The best “grip width,” so to speak, on push-ups is the same as with bench press. You want to find your biacromial distance (the distance between the protruding bumps, called acromion processes, on your shoulders) and multiply that by 1.5. For me, my acromion processes are 14 inches apart, so my ideal hand width is 21 inches, which is right around shoulder-width. For more on this topic, read my Your Best Bench Press Grip article.
Aside from hand width, make sure you’re pressing through the heels of your palms during the push-up, not through your fingers. This is similar to using an open grip on the bench press. You’ll generate more strength and power this way.
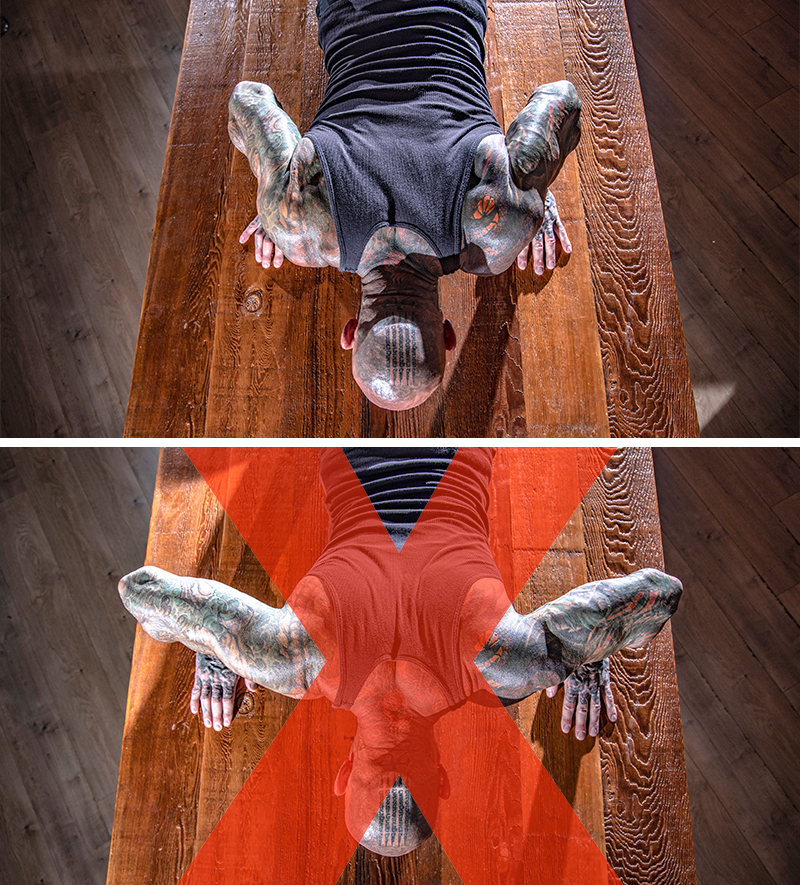
As for the elbows, make sure they’re tucked in close to your sides. I can’t stress this enough. You do NOT want your elbows flared out and pointed to the sides. That’s a shoulder injury waiting to happen. Again, this is consistent with proper bench pressing form.
In the below photos, the top one shows the correct form, with the elbows tucked in. The bottom photo shows the elbows flared out (bad form).
Push-ups involve more than just the chest, shoulders, and triceps. The core also plays a huge role. When doing push-ups, you’re also essentially doing a plank. Throughout each set, keep your belly button pulled in; you’re not contracting your abs, but rather using your deep transverse abdominis muscle to “suck in” and keep the core strong.
This plank position means your body is in a straight line, and this should extend all the way to your head. Keep your neck in a neutral position by looking straight down at the floor while you do push-ups. Don’t lift your head to look forward, and don’t tuck your head to look down toward your feet. Keep your spine healthy at all costs!
The push-up is not a true measure of upper-body pushing strength because it really doesn’t use a heavy enough resistance. Because your feet are on the floor, you’re not pressing your entire bodyweight; for example, if you weigh 200 pounds, with a standard push-up it’s not like you’re bench pressing 200 pounds (significantly less than that, in fact).
That said, different variations of push-up increase or decrease the amount of resistance. I’m talking here about your four basic push-up variations: standard push-ups, with your feet on the floor; feet-elevated push-ups (aka, “incline” push-ups), where your feet are resting on a raised surface like a bench, chair, or step; hands-elevated push-ups, where your feet are on the floor and your hands are on a raised surface; and knee push-ups, where your knees are on the floor.
In one study (see reference at bottom), researchers looked at these different variations to determine what percentage of bodyweight was used in each one. Here’s a snapshot of what they found:
Standard Push-Up: around 65%-70% of bodyweight
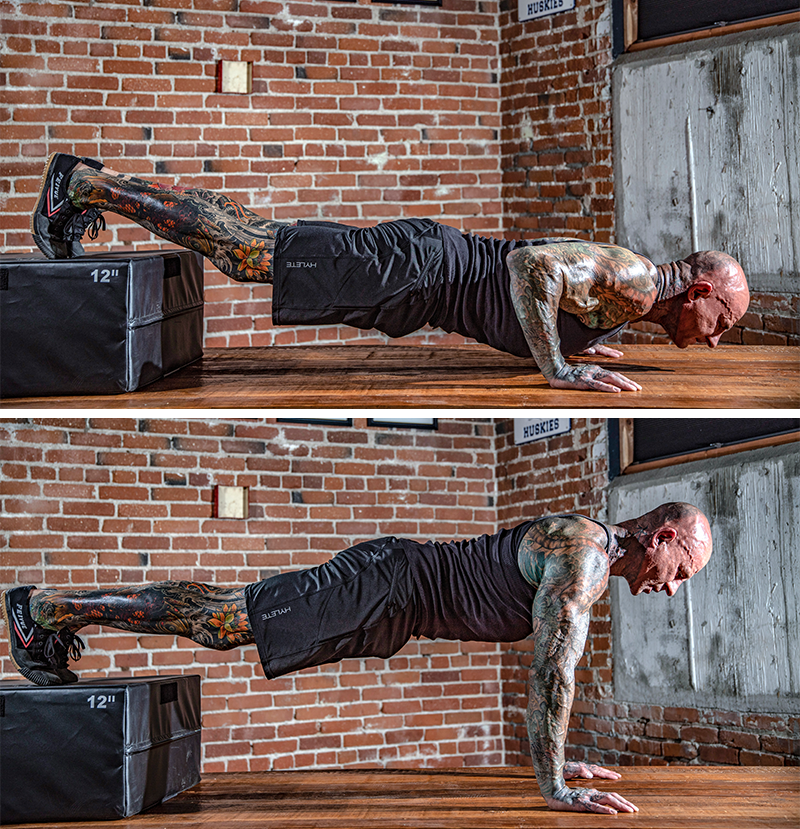
Feet-Elevated Push-Up: around 70%-75% of bodyweight (with feet elevated 12 inches or so). The higher your feet are elevated (i.e., using a 24-inch box instead of a 12-inch one), the higher the percentage of bodyweight.
Hands-Elevated Push-Up: around 50%-60% of bodyweight (using a 12- to 24-inch raised surface).
Knee Push-Up: around 50% of bodyweight (knees bent and resting on the floor)
These different variations, of course, also target different areas of the chest, since the angle of movement changes. Feet-elevated push-ups emphasize more of the upper chest, and hands-elevated push-ups target more the lower pecs – this in addition to increasing or decreasing the percentage of bodyweight used. Both standard and knee push-ups hit what I like to call the “middle” chest.
Feet-Elevated Push-Up (using a 12-inch box):
The usefulness of these variations is pretty straightforward. If you’re not strong enough to do standard push-ups for the number of reps you’d like to hit, you can elevate your hands to make the movement easier or keep your hands on the floor and do knee push-ups. Likewise, if you want to make the movement more difficult (or if you want to target the upper pecs), elevate your feet.
When you’re at the gym, you can easily elevate your hands or feet using a bench, plyo box, or even the bar of a Smith machine. If you’re training at home, pretty much any sturdy chair will work.
You may think you’ll never need to use knee push-ups or hands-elevated push-ups, because you’re plenty strong enough to bang out 20, 30, 40, or even more reps of standard push-ups. But once you try the push-up Tabatas in my Super Shredded 8 program, you’ll change your mind.
I don’t care how strong you are – doing standard push-ups for 20 seconds straight for all eight rounds with only 10 seconds rest between each set is absolutely BRUTAL. When you first do these Tabatas, you’ll most likely need to switch to one of the less difficult push-up versions at some point during the eight rounds (probably by the halfway point, if not sooner).
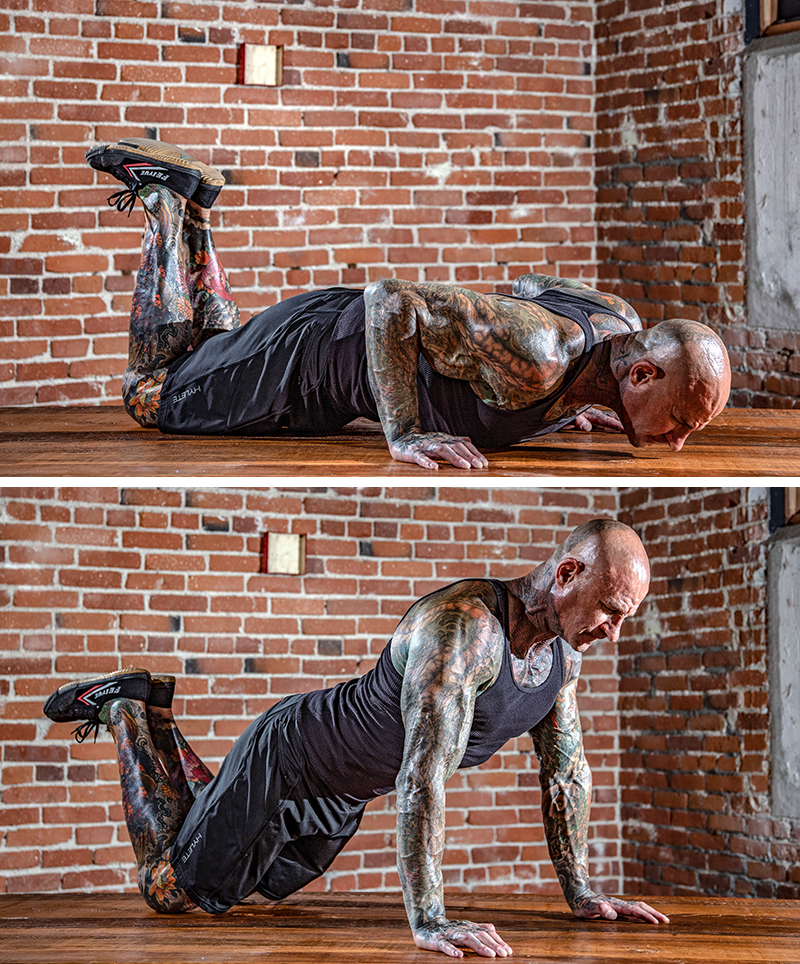
I highly recommend implementing hands-elevated or knee push-ups in this case (see photos below), as the most important thing with Tabatas is that you keep going the entire 20 seconds in each round. By all means, make it your goal to eventually go through the entire Tabata with standard push-ups, but use the easier variations at first.
Remember, doing high reps of push-ups isn’t about pure strength; it’s strength-endurance. Chances are, you don’t have the endurance yet to complete all eight rounds of Tabatas with standard push-ups.
Hands-Elevated Push-Up (using a 12-inch box):

Knee Push-Up:
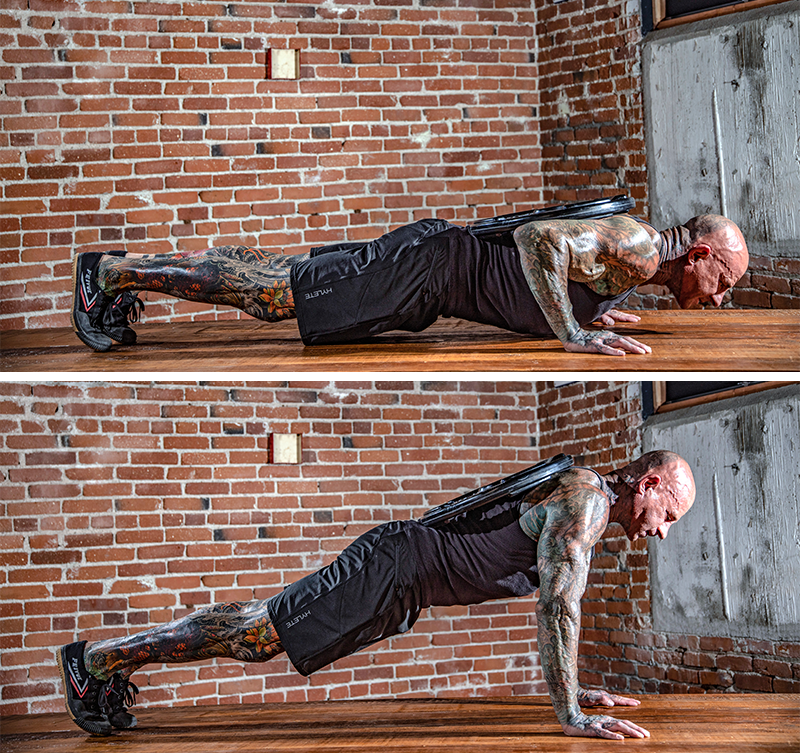
Let’s say you want to stick with the standard push-up position, but you want to make it more difficult to hit a lower rep range (ie, 10-15 reps instead of 20+). In this case, you’d add resistance to your push-ups, and there are a few different ways to do this…
With a weighted push-up, you simply rest a 45-pound weight plate (or lighter) on your back while doing the exercise. It helps to have a partner helping you put the weight in the right place so it’s balanced, but you can also do it yourself even though it’s a bit awkward. If you have a weight vest, that’s another way to do weighted push-ups.
In this set of photos, I'm demonstrating a weighted push-up with a 45-pound plate on my back:
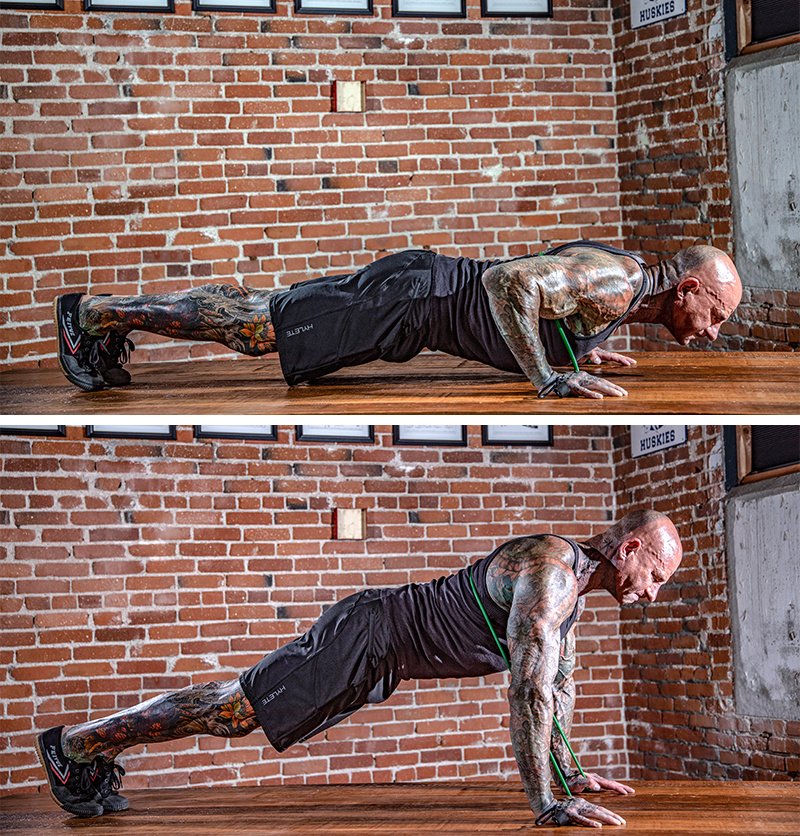
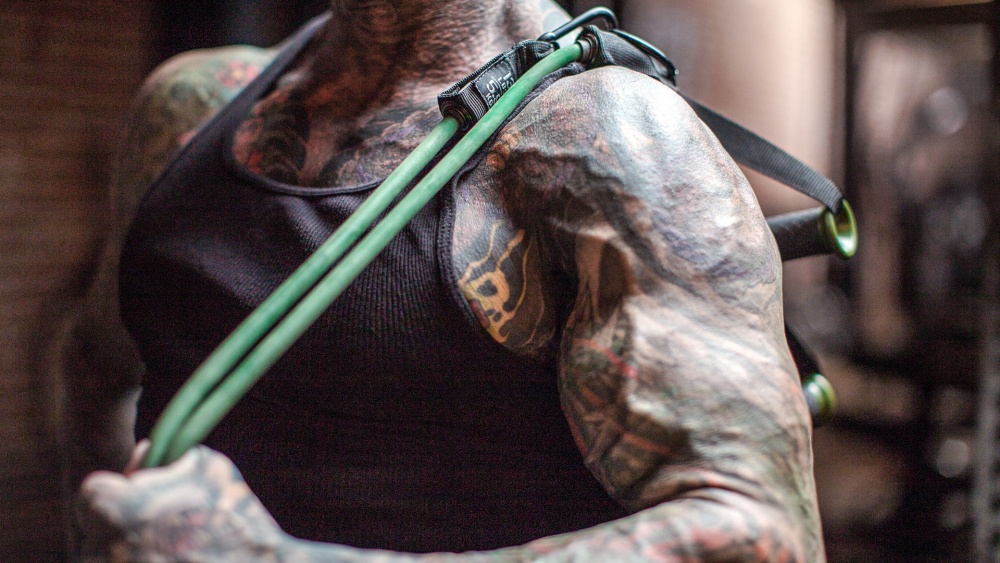
You can also add resistance with an elastic band. To do this, secure the band on your upper back and have it running down your armpits to help keep it in place during the set. Hold the ends of the band in your hands on the floor, making sure there’s a good bit of tension. If it’s loose and/or not providing enough resistance, simply shorten the band by holding it higher up in your hands. (See below photos.)
One issue with push-ups is that the shoulders and triceps often get worked more than the chest because the floor stops you from dropping your chest lower than your hands – this limits involvement of the pec muscles. One way to solve this problem is to elevate your hands several inches using yoga blocks or other stable accessories (placing each hand on top of one or two yoga blocks). This will allow you to drop your chest lower than the level of your hands for greater chest involvement... and development. This variation can also be done from your knees to make it less difficult.
For a demonstration, watch this video:
Find push-ups on Day 1 of all eight weeks of Super Shredded 8, performed as Tabata intervals after working chest. Push-ups are also prominently featured in my Fitter, Faster, Leaner program via my Density Training Push-Up Program.
Do you have a goal to do 30, 40, even 50 push-ups non-stop? Check out my Density Training Program.
Ebben, W., et al. Kinetic analysis of several variations of push-ups. Journal of Strength & Conditioning Research 25(10): 2891-2894, 2011.
Related Articles

Push-ups can and should be a mainstay in your upper body training. Here's how to implement them correctly.

Stuck at home or on the road without a gym? No excuses - do this bodyweight-only, full-body circuit wherever you are to stay lean and even build some muscle.

The Push/Pull/Leg circuit is a classic training style that hits all the key muscle groups in a short amount of time. Here are a few of my favorite P/P/L routines.

Bang out high reps of push-ups like Rocky Balboa with this proven density training method.
Foundations
Featured Meal Plans
Muscle Hypertrophy: Build Muscle Fast
Rethink Your Rep Range
The Science of Strength Bands
Training
Nutrition
Supplementation
Health