Build a Bigger Chest
The ultimate guide to chest workouts. Learn how to build a bigger chest with the right exercises and techniques.

The ultimate guide to chest workouts. Learn how to build a bigger chest with the right exercises and techniques.

A big, well-developed chest is a sign of a true bodybuilder, and something every weightlifter wants. However, the pectoral muscles can be notoriously difficult to build up. From an aesthetic standpoint, a great chest isn't just big and massive—it's big and well-proportioned through the upper, middle, lower, inner, and outer sections of the pecs.
Balance is critical here—you don't want your chest to be thick down low and thin up top, nor do you want a densely muscled chest that has no width or detail to it. You want pecs that look great from top to bottom and side to side, particularly when it's time to take off your shirt at the pool or beach this summer. Achieving this requires well-diversified chest-training protocols—like the ones below.
The bench press is the ultimate test of upper-body strength, and it's a great exercise to build impressive muscle mass in the chest, shoulders, and triceps. Unfortunately, the bench press has a bad rap for causing shoulder injuries. This isn't due to the bench press being a dangerous exercise, but due to so many people doing the bench press incorrectly. The correct way to do the bench press does NOT involve flaring the upper arms straight out to your sides as you lower the bar down to your upper chest.
The correct way to do the bench press is to tuck the upper arms into your sides more so that your upper arms form about a 45- to 60-degree angle with the sides of the torso. To do this, you actually involve the lats a lot by contracting them to pull your arms in, as if you were holding two grapefruits in your armpits, as you lower the bar to your lower chest. You then drive it back up toward your upper chest so that the bar follows a bit of an arced path, versus a straight up-an-down vertical path. Using your lats properly in this manner will not only spare you from shoulder injuries but will also help to increase the amount of weight that you can bench press.
The barbell bench press is one of the most polarizing exercises you can find. Pretty much everyone agrees that it's a great move for building maximal upper body pressing strength. But as I referenced above the bench press "haters" will say the exercise is a surefire way to hurt your shoulders and possibly tear a pec muscle. Not if you do it correctly!
The position of your upper arms (where your elbows are pointing) is the key to a safe and effective bench press. As I said, you don't want your elbows pointing straight out to the sides with your upper arms perpendicular to your torso; not only does this put undue stress on the shoulder joints, but it limits your pressing power and strength.
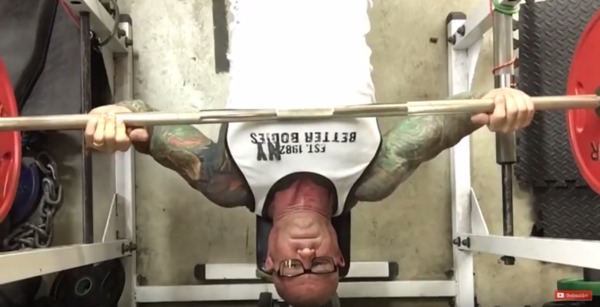
Here's an example of TOO WIDE OF A GRIP on a bench press. For the sake of your shoulder joint health, this is what NOT TO DO.
The sweet spot for your upper arms on bench press is somewhere between a 30-60-degree angle with your torso. This is not only a more stable position for the shoulders, but it also allows you to use more of your lats. Yes, the bench press is primarily a chest exercise (with the shoulders and triceps playing direct roles as well), but the more total muscles you have helping out, the more weight you'll be able to lift.
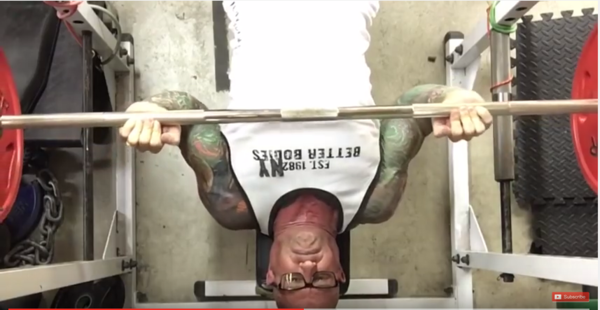
Here's the CORRECT upper arm angle for the strongest and safest possible bench press:
Long story short, it all starts with the grip. If your hands are too wide, you won't be able to tuck your elbows in enough. If your grip is too narrow, you're doing close-grip bench—a great triceps exercise, but not exactly the best way to push the most weight.
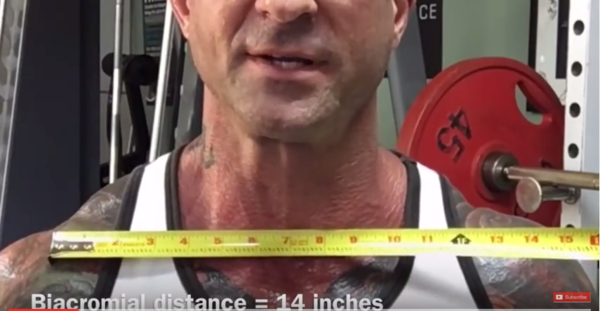
So how do you know what the right grip is? My favorite way to figure it out is through a simple formula that incorporates your "biacromial distance."
You have protruding bumps on either side of your shoulders called the acromion processes. The distance between these bumps is your biacromial distance. Mine, for example, is 14 inches.
Take the biacromial distance and multiply it by 1.5, and that's your ideal bench press grip width. In my case, it's 21 inches. So when I do bench, that's how far apart I space my hands. From the middle of the bar, I'll measure out 10.5 inches to each side, and that's where my thumbs will hit (not my pinkies).
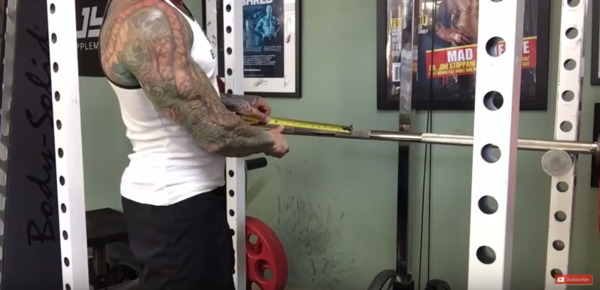
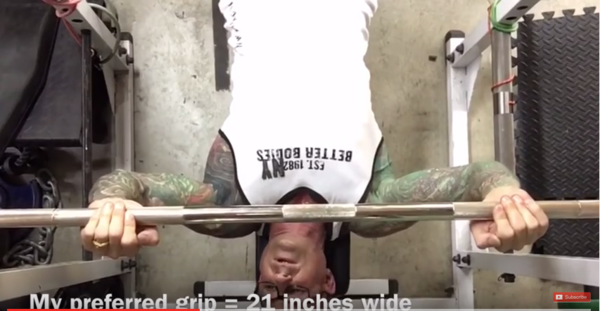
Not much to it. Just a simple formula: Biacromial Distance x 1.5 = Ideal Bench Press Grip Width
Next time bench day rolls around (and every time you bench press thereafter), lock into that grip for maximal power and strength—plus the piece of mind that you're doing everything you can to keep your shoulders healthy.
Here's the full video of me explaining the biacromial distance formula and why it's the best way to bench:
While the squat is the king of leg exercises, the bench press is the king of chest exercises.
Much like the squat, one reason that the bench press is king is because it is a multi-joint exercise that uses, in addition to the chest, the deltoids, the triceps, the lats, and many more muscle groups like the abs and even legs. This allows you to use more weight, which places more overload on the pecs, and that encourages greater muscle growth.
Using heavier weight also helps to boost testosterone levels, and as you likely know, test is one of the more critical anabolic hormones that stimulates muscle growth. Using multiple muscle groups has also been shown to lead to greater levels of growth hormone (GH) during the workout. And like test, GH is also a critical anabolic hormone for encouraging muscle growth.
While some feel that the dumbbell bench press is a much better option for stimulating muscle growth, research has shown that the bench press is one of the best exercises for activating the most muscle fibers in the chest.
One study from the Weider Research Group found that the bench press stimulated significantly more muscle fibers in the pecs than the dumbbell bench press. The more muscle fibers you utilize, the greater the overall impact on muscle size. Plus, the bench press is the chest exercise that allows you to use the most weight. In fact, another study performed by the Weider Research Group found that trained bodybuilders were able to barbell bench press an average of at least 15% more than they could bench press with dumbbells. This allows you to place the most overload on your pecs, and more overload translates into more muscle growth over the long run.
Now that you've been educated on the importance of using the bench press to build size and how to properly bench press for safety and size, you need to know how to use it in your chest workouts. Follow these rules:
Rule #1: Bench first – Because the bench press is a multi-joint exercise, it allows you to go heavy and maximize the overload placed on the pecs. So it makes sense to bench first when you are strongest and not fatigued to allow for the heaviest weight possible.
Rule #2: Bench last – Yes, this tip completely contradicts Rule #1, but hear me out. Because the bench press is a multi-joint exercise, it uses not only the pectoral muscles of the chest but also the deltoids, triceps, and even the lats. These muscle groups assist the chest so that you can lift heavier weight. While that is good for overloading the chest, it also can be bad if one or more of these muscle groups becomes the weak link in the exercise and they fatigue before your chest does. That leaves you ending each set of the bench press when the triceps or delts fatigue—not when your pecs fatigue.
That is not optimal for muscle growth because one way that muscle grows is by the chemical changes that occur within muscle cells when they reach muscle fatigue. If you fail on the bench press before your pec muscle fibers have been adequately fatigued, then you are missing out on an important process for muscle growth. By using a training technique called pre-exhaust you can ensure that the pecs are the weak link on the bench press and are fully fatigued. To use pre-exhaust with the bench press, you do a single joint or isolation exercise, such as the dumbbell flye before you bench press.
Rule #3: Do 4-5 sets of the bench press – Volume (the number of sets and reps you do for a muscle group) is important for muscle growth. Since the bench press is one of the most critical exercises for building a massive chest, you'll want to make sure that you are doing an ample amount of sets for stimulating serious size.
Rule #4: Mix up your weight and rep ranges – Although research has established that a rep range of about 8-12 reps is best for stimulating muscle growth, you never want to stick with the same weight and rep range for too long or your progress will stall. Be sure to include sets as low as 4 reps to as high as 30 reps.
Rule #5: Up your intensity – To really push muscle growth forward, you not only need to fatigue the pec muscle fibers by going to muscle failure on most sets, but you need to go beyond muscle failure. How do you go past the point that a muscle fatigues? By employing intensity techniques such as drop sets, rest-pause, supersets, and tri-sets, to name a few.
What I've put together here is a routine that encompasses three weeks of training—training chest once a week during this period—and targets all major areas of the pecs with a variety of equipment and from a multitude of angles. Let me break it down exercise by exercise:
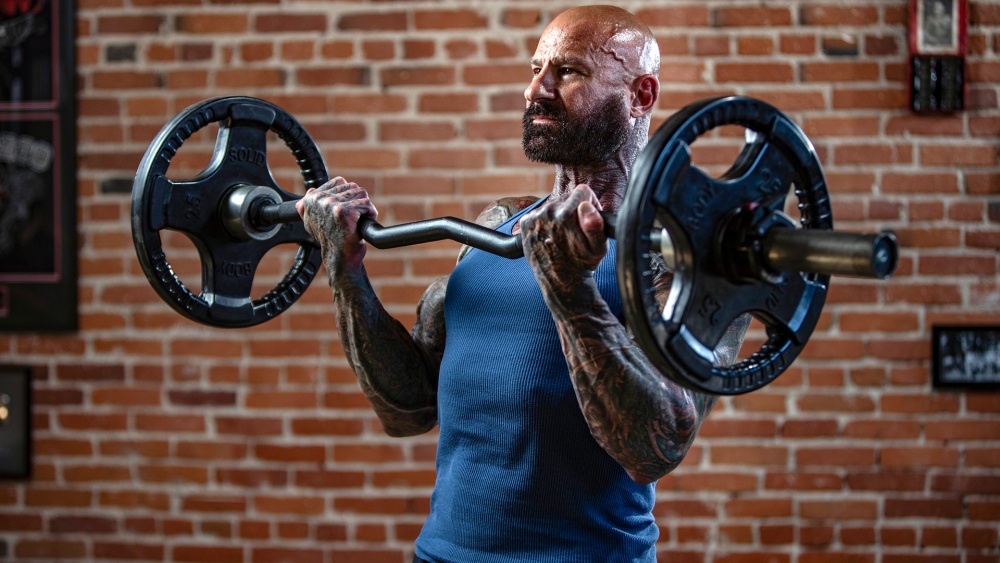
Bench Press—Arguably the most identifiable chest exercise there is (aside from maybe push-ups), bench press shows up in all three workouts as a means of building overall size and strength in the chest. But bench doesn't always show up in the same place every week. In Week 1 it's the first exercise performed, and with a pretty straight-forward set/rep scheme (4x8-10) that promotes hypertrophy (muscle growth) above all else. In Week 2 bench press is done as the second component of a superset after pre-exhausting the pecs with a flye movement. Pre-exhaustion ensures that the pecs will get thoroughly fatigued without the triceps giving out before that. In the final week, bench press moves back to the first exercise, but this time with sets of 6-7 reps to put more of an emphasis on strength. But don't forget, strength begets size. The stronger you are in your chest, the more weight you'll be able to use on all exercises for greater overload on the muscles and more mass.
Reverse-Grip Press—This exercise, done in Week 1, hits the triceps more, right? Wrong. This is all about targeting the upper chest, a trouble spot for many people (men and women alike). Reverse-grip bench press, when performed with a shoulder-width grip, has been shown in studies to increase muscle activity in the upper chest by around 30% as compared to using a standard overhand grip. This has become one of my favorite exercises for the chest, as I'm always trying to hit those upper pec fibers.
Incline Dumbbell Flye—I included this move in Weeks 1 and 2 for one major reason: to completely isolate the upper pecs with a single-joint exercise. (A secondary reason is that flye hit the outer pecs nicely as well.) In Week 2 I use it as a pre-exhaust in a superset with an incline dumbbell press.
Cable Crossover—Crossovers shows up twice in this routine, in two different forms. In Week 1 you'll be doing crossovers with the pulleys set midway up the cable column. This hits more of the middle portion of the chest. In Week 3 you'll move the pulleys down low and pull the handles upward to target the upper pecs. Both crossover variations, however, will sufficiently hit the inner and outer pecs for greater width and detail.
Dumbbell Flye—Here we have a single-joint free weight movement performed on a flat bench that will isolate the pecs and hit the outer areas. Dumbbell flyes lead off Week 2 as a pre-exhaust before bench press. This is a pretty intense way to start a chest workout!
Incline Dumbbell Press—This is truly one of the best mass-builders you can do for the chest, particularly the upper pecs. In this routine, incline dumbbell presses show up in Weeks 2 and 3; in the latter workout, they're done immediately after pre-exhausting the upper pecs with incline dumbbell flyes. We're talking about a real bread-and-butter chest exercise here.
Pec Deck—I mention this exercise last because it finishes off all three weekly workouts in this program. By the time you reach the pec deck, your chest will be pretty fried. So put a relatively light (but still challenging) weight on the machine and bang out one set of 30 intense reps. If you can't get 30 reps consecutive, no problem—rest pause until you get there. I actually prefer a rest-pause set here versus a continuous one. Just means 30 reps done with a heavier weight! The pec deck hits both the inner and outer pecs and is yet another isolation move for the chest.
Try this chest training program that puts all of the rules and exercises discussed above into practice to spark new pec growth. Implementing it is easy—insert the workouts into your program on the days you normally train chest. For optimal results, I suggest that you train your chest in the first workout of the week. If you prefer to train chest twice a week, do these workouts the first day of the week and do a lower-volume chest workout later in the week.
Many of you may already know that I am a big believer in the reverse-grip bench press for building up the upper chest. That's because research shows that this exercise increases the muscle activity of the upper pecs by 30% more than the bench press with a regular overhand grip.
Although the incline bench press is a popular exercise used to hit the upper chest, research shows that it only increases the muscle activity of the upper pecs by 5% more than the flat bench press.
I've been doing an exercise that I call the reverse-grip incline bench press and seeing good results. I figured that since the reverse-grip bench press increases muscle activity of the upper pecs by about 30% and the incline bench press increases the muscle activity of the upper pecs by about 5%, combining these two exercises into one would have additive effects on boosting muscle activity of the upper pecs. We'll have to see what future research concludes on my theory, but in the meantime, it seems to be working great for me and for many whom I've suggested it.
To do this exercise, unrack the bar from an incline bench using an overhand grip. Lower the bar to your chest and then switch your grip to an underhand, or reverse grip that is much wider than shoulder width. From there, press the bar up in an arc from your chest until your arms are at full extension, but not locked out at the elbow. Slowly lower the bar to the chest and repeat for reps. Be sure to use light weight until you get used to doing this exercise.
I suggest you do this exercise towards the beginning of your chest workout when your chest is strongest.
Click the link below for my Upper Chest Blast Workout, which shows you how to use the reverse-grip incline bench press in your chest workouts to build a bigger upper chest.
In addition to the reverse-grip incline bench press, which uses a barbell, the reverse-grip incline dumbbell press is a way great to target the upper pecs as well. The dumbbells allow for a freer range of motion than a barbell and force each arm to work independently of the other for the best development of balanced pec size, as well as strength.
To do this exercise, grab a pair of dumbbells and sit on an incline bench set to an angle of about 30-45 degrees. Start with your arms extended straight above you while holding the dumbbells with an underhand or reverse-grip. Maintaining the underhand grip, slowly lower the dumbbells to your lower chest and then reverse the motion to press the dumbbells back up to the start position. Repeat for reps in this manner.
As you may have seen in Train Like Jim Workout #1, linked below, I like to finish the reverse-grip incline dumbbell press with an extended set straight into standard incline dumbbell presses. To use this technique, do a set of reverse-grip incline dumbbell presses. Once you reach failure with the reverse grip immediately turn your wrists to an overhand grip and finish the set with standard incline dumbbell presses until you reach failure again. Your upper chest will be blasted after finishing this extended set.
Push-ups are hands down a great exercise (pun intended!). In fact, they are one of the first exercises I did regularly as a very young kid. And I'm talking 6 or 7 years old. And regardless of how much muscle I gained or how high-tech my workouts became, I always kept push-ups in the mix.
Unfortunately, a lot of people tend to give up on push-ups as they get more involved with weight training. For some reason, they feel that push-ups are an inferior exercise compared to the bench press or other exercises you can do for the chest. But push-ups remain a great exercise regardless of how much you can bench press or how big your chest gets. Standard push-ups are a great market for upper-body muscle endurance. Plus, they not only work the pecs, delts, and triceps, but they are actually a great exercise for the core. And you can do push-ups anywhere with no equipment needed. This makes them a great exercise for when you are traveling or stuck without any equipment.
One problem with push-ups is the fact that you can only quantify how many reps you can do, but you can't really quantify the true resistance or "weight" you are using. Sure you know how much you weigh, but when you do a push-up you are not using 100% of your body weight. And what type of resistance are you using if you put your feet up on a bench to do a decline push-up? Or you put your hands up on a bench to do an incline push-up? Sure these change the amount of your body weight that you are using, but by how much?
Researchers from the University of Wisconsin-Parkside set out to calculate exactly how much weight you are lifting when you do the push-up in different variations. They had subjects perform six different versions of the push-up on a force plate to measure how much of their body weight they were supporting during the push-up. They had them do standard push-ups, two different levels of decline push-ups, two different levels of incline push-ups and knee push-ups to cover all the bases. They reported in a 2011 issue of the Journal of Strength & Conditioning Research that when they did the standard push-up they used 65% of their body weight. So in other words a 200-pound man would be using a weight of about 130 pounds.
When the subjects placed their feet up on a one-foot high box to do a decline push-up, it increased the percent of their body weight being used to 70%. That means that the 200-pound man would be using a weight of about 140 pounds. When they placed their feet up on a two-foot box it increased the percent of their body weight to 75%, s which equals about 150 pounds for the 200-pounder. When they placed their hands up on the one-foot high box to do an incline push-up, it decreased the percent of their body weight is used to 55%, s the 200-pounder would be using only about 110 pounds. When they placed their hands up on the two-foot high box, it decreased their percent body weight being used to just 40%. That's about 80 pounds for the 200-pound guy, and when they did push-ups on their knees, they used 50% of their body weight. That, of course, is about 100 pounds for the 200-pounder.
The push-up is a great exercise for developing the pecs, as well as for building upper body muscle strength and endurance. Now that you can calculate how much weight you are lifting when you do push-ups, hopefully, it will help you gain more respect for the push-up and use it more frequently. It can also help you calculate how much weight to add to your body weight to get closer to your bench press weight. For example, a 200-pound guy who can bench press 185 pounds for 10 reps would need to add 80 pounds of weight, such as from a weight vest, to get close to his bench press weight, to do 10 push-ups.
One great way to use push-ups is to do them at the very end of a chest workout when the pecs are fried. I like to do extended sets by starting with one set of decline push-ups, immediately followed by regular push-ups, immediately followed by incline push-ups. Repeat that three times and you will definitely appreciate push-ups more.
Reference:
Ebben, W., et al. Kinetic analysis of several variations of push-ups. Journal of Strength & Conditioning Research 25(10): 2891-2894, 2011.
I get asked a lot of questions regarding what solutions I have for exercises that can be done when you either don't have the type of equipment needed, or just want to try something new. If you're anything like me, chances are you are always trying to innovate ways to target specific areas of a muscle group, and by doing this sometimes find that you have created a new way altogether to train using a specific piece of equipment.
Many people don't really know the difference between the machine flye and dumbbell flye. Certainly they both work the chest, however the common belief is that they are the same or similar movement. In the video below, I dive into their similarities and differences, and offer a tip for using the machine flye to help grow your upper pecs.
When it comes to trouble spots on a guy's physique (and a woman's too, for that matter), the upper pecs are a common complaint. And it's not only upper chest thickness that people tend to lack, but also a definitive separation between the right and left pecs. This upper, inner chest area is highly visible when you wear a V-neck shirt, tank top or button-down, so we're talking about a critical element to having a complete physique.
This is a hard-to-reach spot for many individuals, and if you're only focusing on it with incline dumbbell flyes you're missing the tension where you need it most: At the top of the movement, when the hands come together. At this point, you're no longer moving the resistance against gravity, as the last bit of range of motion on a dumbbell flye is basically just horizontal (moving perpendicular to the floor). Switching to cables, however, will provide the continuous tension you need to target the inner pec muscle fibers that come into play when the hands touch at the top. So there's an easy fix to your inner pec problem right there—switch from dumbbell incline flyes to incline cable flyes.
Chances are, you're already doing incline presses to focus on the upper pecs. However, to zero in on the inner chest as well, opt for incline dumbbell presses—or, better yet, reverse-grip incline dumbbell presses as described above. The arc the dumbbells allow you to form as you press up and together targets more of the upper/inner pec fibers than a barbell where your hands are fixed on the bar. (Not that you should stop doing incline barbell presses, of course, as this is a great exercise for building overall mass and thickness up top.)
Below is a workout that will target the upper, inner chest while also promoting overall size and thickness to the pecs, top to bottom. In this routine, you're subjecting the chest to relatively heavy weight on the first two exercises with 6-8 reps, resting 1-2 minutes between sets, then dropping to a moderate weight for incline cable flyes and finishing on the lighter side with cable crossovers, resting 1 minute between sets. For an even bigger impact, once you reach failure on the last set of each exercise, perform one or two drop sets by lowering the weight 20-30% and continuing until failure.
The cable crossover, done from the low pulley is a great single-joint (isolation) exercise to target the upper chest. The continuous tension from the cables helps to hit the inner/upper pec muscle fibers at the top of the exercise when the hands come together.
You can also do this exercise by alternating arms (as I am also showing in this video), which increases the range of motion in the top position so that your arm crosses the midline of the body toward the opposite shoulder. This allows you to further increase the involvement of the inner/upper pec muscle fibers. Try both versions.
I get a lot of questions from guys and girls about how to build up the inner chest more.
Many find that while their overall chest size is good, they lack depth on the inner part of the chest. Instead of a valley running down the middle of their chest, clearly separating the right pec from the left, their lack of inner pec development makes the middle of their chest look like a blur with no clear delineation between the left and right sides.
Working the muscle fibers of the inner pecs all comes down to range of motion and the finish position or top position of most chest exercises. One major movement that the chest performs is called horizontal adduction. This is the bringing of the arms together in front of the body, such as during a flye. The further the arms move together in the top or finish position, the more inner pectoralis muscle fibers you use.
In fact, to really ensure that you are maximizing inner pec muscle fiber use, you actually want to cross the arms in the top position. That's because the further your arms move towards the opposite side of the body, the more inner pec use involved. As I explained above, this is the problem with dumbbell flyes.
Free weights rely on gravity for resistance. Gravity only provides resistance vertically. But to really maximize inner pec use, you need resistance horizontally as the arms move together. Yet on the top position of a dumbbell flye, there is no resistance as you move the dumbbells together. Because of this, guys and women who rely mainly on free weights often have poor inner chest development.
So the best way to get resistance in this position is with cables or machines, such as cable crossovers, cable flyes, and machine flyes or a pec deck. You can also do cable chest presses in a cable crossover station and cross your arms in the finish position. Another trick to use for hitting the inner pecs is to use a closer grip on bench pressing exercises. This brings the arms closer in the top position and helps you use more of those inner pec muscle fibers.
These ten exercises are your best bet for focusing on the inner pecs:
When designing a chest workout to place more focus on the inner chest, consider using pre-exhaust to really blast the inner pecs with laser-like focus. Start with a cable flye movement, such as cable flyes. Consider doing extended sets with cable presses. Once you hit muscle failure on cable flyes, continue the set by doing cable presses, being sure to cross your arms in the finish position. Then move into a barbell pressing move, such as the bench press. But use a close grip to involve more inner pec muscle fibers. Then it's back to more inner pec focus with machine flyes or pec decks. Why not use more pre-exhaust by supersetting these with decline push-ups done with your feet up on the seat of the machine? Then you can finish with cable crossovers, being sure to cross over your arms in the finish position. Rest times between sets are 2 minutes except for cable crossovers, where you should rest 1 minute between sets. Try my sample workout below, which uses fly movements that hit the upper, middle, and lower inner pecs.
One of the many questions I receive is "How do I hit the outer pecs?" While training and experimenting myself, I’ve found internal shoulder rotations to be highly effective at hitting the outer pec. As I explain in the video below, while most would consider this exercise to be predominantly used for rotator cuff exercises it actually hits the outer pec as well.
If you've tried my Biceps Ladder routine then you know that whenever I attach the word "ladder" to an exercise or a muscle group there is going to be a lot of pain, but also a lot of great results from that pain. The cable crossover ladder is no exception.
I love the cable crossover for targeting the chest because it hits both outer and inner pec muscle fibers. Since it places a good stretch on the pecs in the start position, this helps to hit the outer pec muscle fibers. But since it also keeps constant tension on the pecs all the way through to the finish position, it also targets the inner pec muscle fibers.
Another great benefit of cable crossovers is the fact that the cable crossover stations in the gyms today allow you to place the pulleys at almost any height from the floor to above the head.
The pulley position you use for cable crossovers will change up what area of the chest you want to target. Having the pulleys set in the highest position maximizes the amount of focus placed on the lower pecs, while having the pulleys in the lowest position maximizes the focus on the upper pecs.
Placing the pulleys at about shoulder height and keeping the arms parallel with the floor while you do cable crossovers places most of the focus on the middle pec muscle fibers. The higher you place the pulleys from shoulder height, the more emphasis that is placed on the lower pecs. And the lower you place the pulleys from shoulder height, the more emphasis that is placed on the upper pecs.
A great way to blast just about every existing muscle fiber in your pecs from top to bottom and inner to outer is with my cable crossover ladder. Just like my triceps ladder and biceps ladder, you start in the lowest position and move up one notch each time you reach muscle failure until you have reached the very top position. Choose a weight that limits you to about 8-12 reps in the first position. Each time you move the pulleys up one position, the exercise becomes slightly easier, which allows you to continue with little to no rest between positions. That's what you call an Extended Set. Plus, moving up one position each time gradually moves from targeting the upper pecs to the lower pecs and all muscle fibers in between.
Try the chest workout below, which kicks off with the reverse-grip bench press and moves into dumbbell presses before incorporating the cable crossover ladder. Rest 2-3 minutes between sets of the first two exercises, and then blast your way through the cable crossover ladder for a brutal and effective finisher.
For a more muscular, well-balanced chest, I like hitting the pecs with high intensity and hitting all major areas of it: Upper, middle, and lower pecs, as well as the inner and outer portions. The cable crossover station is one of the best places to do this, and extended sets are one of my favorite intensity-boosting techniques. Combine the two and you have the highly effective Cable Crossover Extended Set.
An extended set, already referenced in the above sections, is where you do multiple variations of a single movement in succession without resting, using the same weight and going to failure on each variation. The defining characteristic of an extended set is that you start with the most difficult variation of the movement and move to progressively easier biomechanical positions as your muscles fatigue—this is how you're able to stick with the same weight—and not have to waste time changing the load—throughout the set, and still get a decent number of reps in each position.
Using chest as an example, generally speaking, the most difficult movement variations (the ones where you're forced to go the lightest) are those that target the upper pecs, while the easiest are those that hit the lower pecs. Consider incline presses, flat-bench presses, and decline presses. Most people are able to go heaviest on declines, with incline presses being the lightest, and flat-bench presses falling in between the two. The reason for this is simple: You're in a biomechanically more advantageous position when doing declines than you are with the other two angles, which allows you to use a heavier weight; the incline angle is the least advantageous position.
The same holds true for cable crossovers. Low pulley crossovers, which hit the upper pecs because you're bringing the handles from down low to up near your face, are the most difficult version. High pulley crossovers, where you move the handles downward from up high using predominantly the lower pecs, are the "easiest" variation, thus allowing you to go heavier. Crossovers set in a middle position between the highest and lowest settings on the cable columns fall somewhere between the high and low pulley versions in terms of how much weight can be used.
All that said, my cable crossover extended sets utilize three different positions, in this order: (1) Low Pulley Cable Crossovers, (2) Cables Crossovers from a middle position (pulleys at around shoulder height), and (3) High Pulley Cable Crossovers. This extended set is similar to the Cable Crossover Ladder, but with fewer positions. Here's how you'll do it:
First, choose a weight that will elicit muscle failure at 8-10 reps on low pulley cable crossovers (the most difficult version of the three). Don't go too light here, otherwise the weight will likely be too easy on the other versions. Start your extended set with low pulley crossovers. Pull the handles up in front of your face on every rep to target to the upper pecs. Go to failure (somewhere around 8-10 reps).
Upon reaching failure at the low pulley setting, immediately change the pulley settings to around shoulder height on the cable columns. Do crossovers where your hands stay at the same height and you bring the handles together in front of your chest. Go to failure.
Once again, after reaching failure, adjust the pulleys again—this time to the highest setting possible. Do high pulley crossovers, making sure to pull the handles down and together below chest level and keeping your torso upright (not bent forward) to target the lower pecs. Go to failure once again.
At this point, you've completed one extended set. Rest 2-3 minutes, then repeat the sequence. I recommend doing 3-4 total sets in this fashion. As I mentioned before, ideally you should be getting 8-10 reps on the low pulley crossovers in each extended set. As for the other two positions, don't worry too much about how many reps you get—just go to failure on each one.
This cable crossover extended set is a great way to finish a chest workout, doing pressing exercises beforehand. Here's how such a routine could look:
For further explanation on extended sets and a demonstration of the three crossover variations used in this workout, watch my Cable Crossover Extended Set YouTube video:
If you're looking for the standard heavy barbell and dumbbell chest routine with heavy weights and ample rest periods, you've come to the wrong place. But if you're looking to build a bigger, more chiseled set of pecs from top to bottom, you'll love this ladder workout I'm about to walk you through via exclusive video shot at The JYM, my own personal training studio.
This workout consists of exactly one piece of equipment—a cable crossover station—and only two exercises: Cable presses, and cable crossovers. It may sound simple, but trust me, it's intense. My popular ladder routines focus on a single muscle group (in this case chest, but you may be familiar with my biceps and triceps ladders as well) by way of grueling extended sets.
The basic premise of the workout is this: The ladder/extended set starts with the most difficult version of a movement and gradually makes it easier as the set progresses. The benefit of this is that it allows you to continue the set past failure without resting (as with rest-pauses) and without lightening the weight (as with drop sets). The result? Intensity is pushed to the maximum and the target muscles get a heavy dose of shock treatment, thus setting the stage for new gains in size and even strength.
As was the case with the cable crossover ladder and cable crossover extended sets, the most difficult version of both exercises (cable presses and cable crossovers) is when the cable pulleys are at the lowest settings and your upper pecs are taking the brunt of the movement. In the early stages of both ladders, you're at a biomechanical disadvantage. As the pulleys move up the columns, you're placed in a more biomechanically advantageous position. So while your muscles are fatigued, you're able to keep repping out with the same weight because of your improved biomechanical position.
What I love about this workout is that it hits all areas of the pecs. The upper pecs are targeted when the pulleys are down low, the lower pecs are worked when the pulleys are up high (very similar to a decline press or flye) and the middle portions of the pecs are pretty much worked throughout, but especially when the pulleys are in the mid-range height of the column. Also, both exercises hit the inner and outer pecs, thanks in part to the constant tension provided by the cables.
Give this workout a try the next time you're stuck in a chest training rut. A super intense ladder may be just what your pecs need to get growing again. I demonstrate the entire workout start to finish—and provide commentary and helpful tips while I do it—in this video:
Cable Press Ladder
Place the pulleys in a cable crossover station on the lowest settings. Select a weight for low pulley cable presses that will have you reaching failure in the 8-12-rep range. Grab the pulleys (either in your hands or in the crooks of your elbows as I'm doing in the below video), stand equidistant between the two cable columns, step slightly forward to lift the weight off the stack, and perform low pulley cable presses to failure.
Immediately rack the weights, move the pulleys one notch up and do cable presses to failure once again at the slightly higher pulley position. Continue in this fashion, moving the pulleys up the columns one notch at a time and taking each set to failure, until you've completed a set at the highest pulley positions. There should be no resting during the ladder—only as long as it takes you to rack the weights, move the pulleys up a notch and get back in position for the next set.
After completing the cable press ladder, go right into the cable crossover ladder. Again, no resting.
Cable Crossover Ladder
Perform the exact same sequence for cable crossovers (starting at the lowest pulley setting and working your way to the top) as you did for the cable press ladder. Since you'll be fatigued from the cable presses, you'll probably need to lighten the weight on cable crossovers to be able to hit 8-12 reps on the initial set.
The number of sets you do will depend on how many settings there are on the cable crossover station you're using. Here at The JYM, our cable crossover columns have eight different height settings.
On the first set, you'll pick a weight that will induce failure at 8-12 reps. On each set thereafter, you'll go to failure, whether that means 10 reps, 8 reps, 5 reps, whatever. As you'll see in the above video, my reps don't stay in the 8-12 range the entire ladder; they start dropping down to 5 and 6 reps as I fatigue. That's okay—as long as you're hitting failure on each "rung" of the ladder, you're doing it right.
If you’ve seen my back compound set workout recently, you should know it only makes sense to have a complementary chest routine to go with it. The below workout is great for adding a spark to your chest training, following the same compound set structure as its back counterpart.
In this routine, you'll again start with a big compound movement on a Smith machine (Smith Machine Incline Press, whereas the back workout called for Smith bent-over rows) and immediately follow it with a bodyweight exercise (push-ups, opposed to inverted rows) done to failure. If you want to fully emphasize the upper pecs, feel free to do the push-ups with your feet elevated on the bench. Either way will work.
Again, you'll do 3-4 compound sets of Smith inclines and push-ups, resting two minutes between each compound set. After that, you'll do a press from a different angle (flat-bench dumbbell presses) and finish with an isolation move for the pecs (cable crossovers).
Just to be clear, I'm not implying that you should do this chest workout in the same session as you do the back one; however, if you're an advanced trainee and you normally have a chest and back day, you certainly can. Otherwise, just do this workout when you'd normally train chest.
Try this routine, then reach out to me on Facebook or Twitter and let me know if you found it as challenging as its mirror-image back routine!
Related Articles

For beginners looking to strengthen their chest muscles, try incorporating exercises like push-ups, dumbbell bench presses, and chest flys into your workout routine.

Transform your pecs from top to bottom with this compound set of bench press and reverse-grip bench press.

Grab some dumbbells and get ready to build bigger pecs with this routine.
_4323.jpg)
Dr. Jim Stoppani walks you through Super-Man supersets for building the chest, back, shoulders, and traps.
Foundations
Featured Meal Plans
Muscle Hypertrophy: Build Muscle Fast
Rethink Your Rep Range
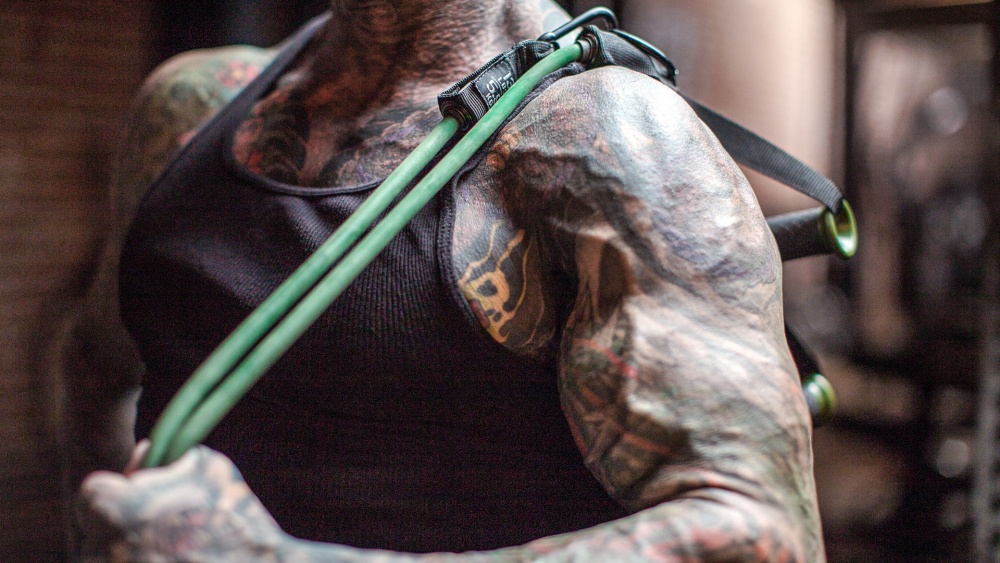
The Science of Strength Bands
Training
Nutrition
Supplementation
Health