Full-Body MED Training Week 2 Live Tutorial Transcript
Instruction and tips for some of the unique exercises used in Week 2 of my Full-Body MED Training program.

Instruction and tips for some of the unique exercises used in Week 2 of my Full-Body MED Training program.

Note: This tutorial video was recorded as a live Facebook event. The text below is an edited transcript of the tutorial intended to provide members with a convenient means of referring to and further researching the topics and content detailed in the video.
Hey, guys. I'm into Week 2 of my Full-Body MED Training. This is my Train with Jim series—you follow right along with my social media pages.
Just go to the Train with Jim page at JimStoppani.com. For those of you watching right now on Instagram, you can go to my bio page, click on the link right there, and then you'll find the Train with Jim link within that link tree. All the workouts, explanations of what the MED program is—pull that up now if you're not already following along going into Week 2. Remember, you can do these programs anytime.
This is a three-week, full-body, micro-loading, extended set, drop set training program. Like I said, I'm now in Week 2. I started last night, got in Workout 1 late last night, so now I'm on to Workout 2.
For those of you who understand the concept of the micro-loading—remember, this is what we call "wave loading" if you will. This is where we increase—so, Workout 1 we used our 8 to 10-rep max for each of the first exercises, and then when we repeat the workout—remember, there are two workouts, right? We repeat these workouts twice a week for four workouts total.
Usually, we're doing Workout 1 on Monday, Workout 2 on Tuesday, and then again Workout 1 on Thursday and Workout 2 on Friday. The second time you complete them in Week 1 you increase the weight—you micro-load—and you'll find my explanation of what micro-loading is—increasing the smallest increment that your gym allows.
I micro-loaded once, and now I'm at the beginning of Week 2 where I micro-load again—another bump up. At the end of this week, when I train Workout 1 Thursday, I'm going to actually decrease the weight back to what I was doing when I trained at the end of the week last week, the same weight. But now, I should be able to get far more than 8-10 reps, and in my extended sets, I should be able to get far more reps as well.
So this is an exciting week because, like I said, as we go through it we go down and then Week 3 we go back up. You'll find that the strength is going to increase along with muscle growth, and the fat loss with full-body training.
I'm going to go through Workout 2 with you guys just to give you a few tips on some of these exercises in the workout here. We're going to be right over here, looking at Workout 2 which I'm actually in the middle of right now. I thought it'd be a great time to come on live, since I'm back here in Hollywood, to break down the MED workouts a little bit for you just to give you guys a few tips.
For those of you who notice my JYM or my "War" shaker—my JYM Supplement Science Blender Bottle—this is the Radian, this is the stainless steel, double-walled—so, this thing literally keeps your drink ice cold all day long. Completely all day long, which is so critical to me because I love my drinks ice cold—particularly my Pre JYM and my Post JYM have to be ice cold for me.
Just remember, though, when you're mixing them don't mix them in ice cold water. You want that creatine and other ingredients to go into solution. The warmer the water, the better. So don't use too-cold water until you get it mixed up, then you can add the ice. Then close this baby up and it's ice cold through the entire workout, through the entire day.
One of the questions I do get is how long can you leave Pre JYM in solution before it starts breaking down—the creatine starts breaking down into creatinine—the safe window is about 8 hours. After about 8 hours, toss it out. Let it go.
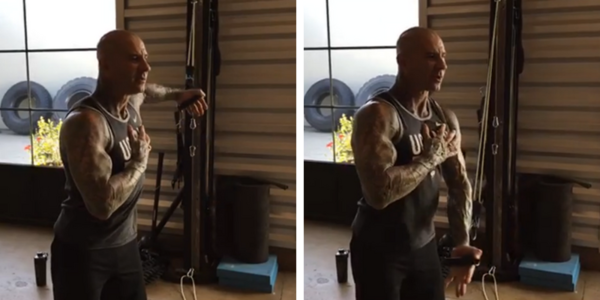
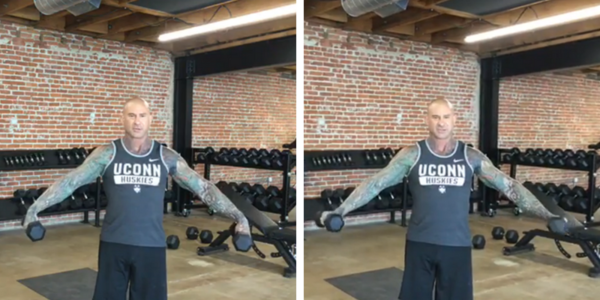
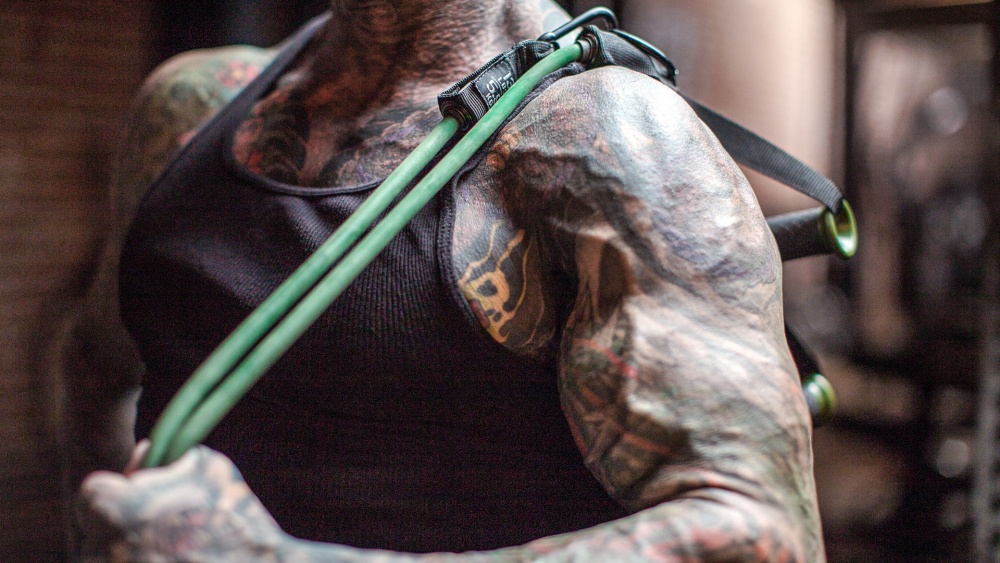
Let's talk about Workout 2. Now, I'm here in my Hollywood JYM—again, waiting on more equipment to come in—I don't have a cable crossover, so what am I doing for my low-pulley cable crossover with the extended set for the cable crossover? Well, I'm actually going to use bands. If you come over here where my band set-up is, I'm going to use bands.
What I have here is—remember, this is a low-pulley cable crossover coming from the low pulley to hit more of the upper pecs which is harder to do than standard cable crossovers coming from a high pulley. Since I don't have a cable crossover station I'm going to simulate this with my bands. I'm simply going to come and use one arm at a time.
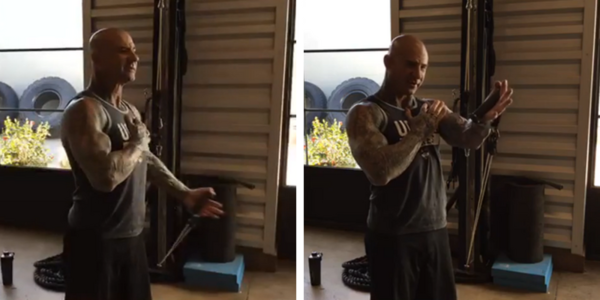
What I'm going to do here is do my 8-10 reps with one arm from the low pulley station—let's make believe I hit failure here, 8-10 reps—then I'm going to immediately change the band up to the high position or have one already positioned as I do here, and now I'm going to do my cable crossovers from the high cable position to hit more of the lower pecs. Once I hit failure there, I'm going to switch arms to the right arm, and then to the high pulley.
One of the things I'll say here, with the drop sets with the bands, is the nice thing about drop sets with bands is you don't even have to change the bands out to really drop set—all you have to do is change your body position. Remember, the further you go away from where the tether point is with the bands, the harder it is to pull the band. So a way to do drop sets here, if you're doing either two or three or four, is to have either two or three or four different standing positions. So you go the furthest for your first set, then when you come back what you do is step a little closer to the tether point. That's going to reduce the resistance on the bands and essentially act as a drop set.
That's what I'm doing, at least today, since I'm doing Workout 2 here in my Hollywood JYM and I don't have my cables yet coming in. Or I'll do this at my home gym where I have my cable crossover station.
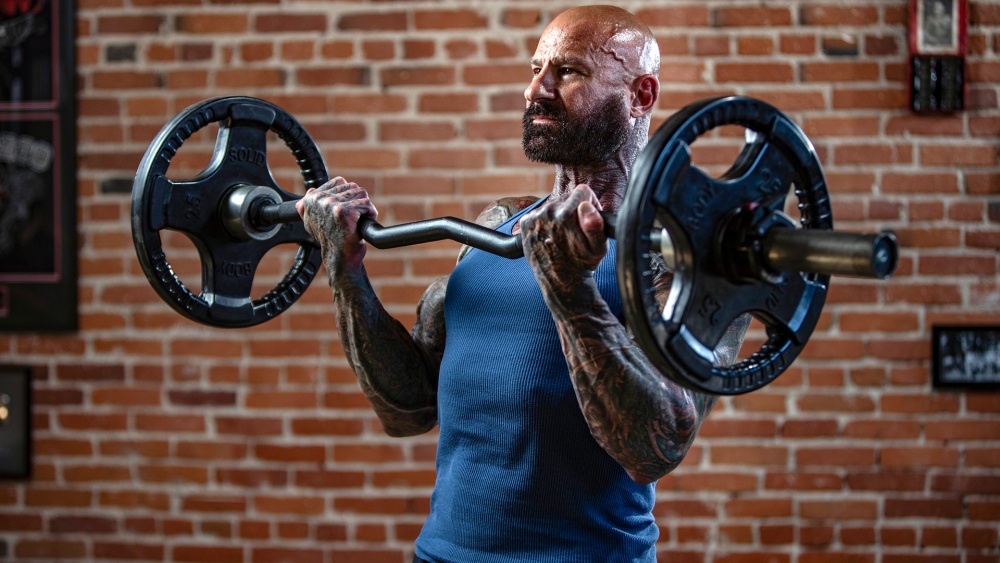
Let's go back here to the whiteboard. For legs, you're doing the barbell hack squat and the deadlift. For those of you who aren't familiar with the barbell hack squat, make sure you watch my video, and I'll demonstrate one of the tips.
Now, the barbell hack squat is really, in simple terms, a deadlift that's done behind the body. Instead of standing with the bar in front of the body—which is going to be Exercise 2, the standard deadlift where the bar's in front of the body, that means your center of gravity is more forward—with the barbell hack squat you're simply stepping in front of the bar and doing pretty much that same move: A deadlift—you're lifting the bar off the ground.
The difference here is because the bar is behind me my center of gravity is back more which means I get less stress on my lower back, so it's great for people who find that deadlifts are just too much because they have a back injury. Also, because the center of gravity is back more with the barbell hack squat—the barbell behind me—the muscles that are involved are slightly different than the deadlift.
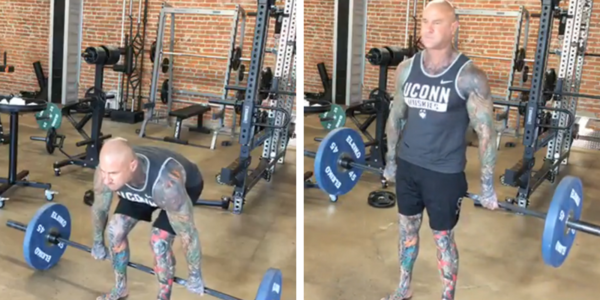
The deadlift, you have more extension at the hips, so more glute and hamstring involvement because the bar's in front, your center of gravity is more forward, so you have to pull it back to correct your center of gravity—bring your center of gravity back more to the center, if you will. With the barbell hack squat you've got the bar behind you, so center of gravity's back more and coming forward. What that does is it uses more of the quadriceps, as you'll find.
So this is a great exercise to really hit the quadriceps because, again, the bar's behind you so the movement of that barbell is focusing more on utilizing the quadriceps—and because the bar is behind you, your torso is more upright; that also uses less glutes and hamstrings, more quads.
Now, one of the problems people find with the barbell hack squat is they have the trouble where they come up and it's short—you see the bar hits their legs. That's going to depend on your body, depending on your arm and your leg length, and the relationship of your arm to your leg length. Everyone is an individual. Just because you have long legs doesn't mean there's a standard position for you—you might have short arms; you might have long legs and long arms—where you grab the bar is going to be different. Try different grip widths on the bar. If you're going too wide, the bar's going to hit where you're not fully extended yet.
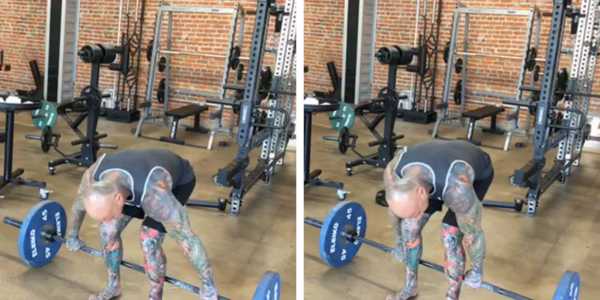
By bringing your hands closer, you're extending the length of your arms—the bar's going to be lower—and now that's going to allow the legs to come up higher before the bar hits them, and it's a much smoother ascent there. So try different grip widths, and especially in relation to your feet width. Typically, you want to do a hip to shoulder-width stance, then play around with the grip—how wide or narrow you go—until it's nice and smooth on the ascent.
Another exercise that you might be wondering about is the Arnold press. For those of you who aren't familiar with this, you can watch my videos on the Arnold press. I have you extending it with the dumbbell press.
Over here at my dumbbell rack—I prefer to do these standing because I do most of my exercises standing. It's going to hit more of the core and you're going to burn far more calories, so I like doing my shoulder presses standing.
However, if you find that standing is causing you to use less weight and your main goal is to build big boulder shoulders, then you'd be fine using an incline bench where it's nice and flat. Just make sure that your torso is as upright as possible—you don't want to be doing incline dumbbell presses thinking you're doing shoulder presses.
With the Arnold press, you're going to hold the dumbbells in front of the body—palms facing you—and then as you bring the dumbbells up overhead, you turn your wrists out so that now at the top position your palms are facing forward. Then you simply reverse it back down. After you hit failure there—I tend to change my hand position because I like to do an open grip on shoulder presses—you're going to do your extended set with standard shoulder presses. I'm just going light here to demonstrate the movement. Then you're going to follow up with your drop sets there.
Now, another exercise that you may wonder about is the prone incline dumbbell shrug. Here, "prone" just means your position on the bench—prone meaning face down; supine, the other way around. Here you're going to lie on the bench face down holding the dumbbells, and what this is going to do is focus more on hitting those middle traps versus the upper traps. So the extended set here is to go from prone incline dumbbell shrug right into a standing shrug, so we go from hitting middle traps on the bench to upper traps when we do the standing version in our extended set.
You're simply going to lie on the bench—now, on the dumbbells, they just extend straight down and then, just using your traps—keeping the arms straight—you're going to shrug the dumbbells up and back down. It's that short of a move focusing on those middle traps. Then you're going to put the weight down, immediately switch into standard dumbbell shrugs to hit those upper traps—and that's that extended set.
Another exercise you may question is the forearm extended set that I have you guys doing. Here you're going to do what I call the standing dumbbell reverse wrist curl. What you're simply going to do here is you do your reverse wrist curls standing. If you do that, you're going to bring the dumbbells just out to the sides a bit and then you're going to do your wrist extensions or your reverse wrist curls this way, fighting gravity. Once you hit failure there, you go right over to a bench, sit down, and now you do your standard wrist curls with the arms on top of the legs.
Then back to the board, another unique exercise here is the—actually, I was thinking of Workout 1, I want to show you guys Smith machine crunch with the Smith machine hip thrust. Over here on the Smith machine, when you're doing Workout 1—for those of you who haven't seen this, I have videos on both of these exercises—what you're going to do is set your weight up on the Smith machine for the crunch, the barbell over your midsection, and then explosively you're going to come up and back down. Once you hit failure there you're going to bring the bar up and do your Smith machine hip thrust.
Now, for those who think this is a dangerous exercise, remember Smith machines have safety latches. Each one is a little different. Mine, rarely do I have to put it on, but other ones just sort of flip out. If your gym manager's telling you that you shouldn't do this exercise because the bar on the Smith machine can slip and fall, they don't know their own Smith machine. Each Smith machine has a safety that prevents the bar from slipping.
So when you're doing your hip thrusts—which is going to be like this—if it did slip the weight's going to be caught on the safety mechanism. Teach your gym manager, if he's telling you not to do that exercise, how to use his own Smith machine by showing him the safety latch.
Those are some of the workout tips for my Full-Body MED Training. Like I said, I'm now in Week 2. You can go back, you can start this any time you want. You can jump right in now if you want, or you can follow along. I started last week. Keep following up with me. We're going to do this for three weeks, then we'll switch it up into another technique.
Remember, these are my personal workouts—you get to do these right along with me, getting the same results, inspiration, all along with me. It's my Train with Jim series.
For those of you who have questions now, I can't read your questions so post your questions here. I'm going to put this video up—I'll save it on my Facebook page as I always do so you can go back anytime—put up your questions there, I will answer right there within 24 hours to get you an answer. Try to keep it focused on the MED training. If it's supplements, hopefully it's focused on the MED training, you're doing that program. If not, try to ask those questions in other posts that are more pertinent to that topic. But again, don't worry—if you have a question, I want to get you an answer. Post it where you can.
That's all I've got for today. Tomorrow's Wednesday, so you'll get a day off if that's your off day from the program. It doesn't mean you're going to sit around all day. Remember, you guys have to stay active. Remember my 30/60 Rule: For every 30 minutes you're inactive—you're seated—make sure you do 60 seconds of activity. Stay active all day, guys. And on your active rest day it doesn't mean you can't get into the gym and do something like med balls, Tabatas, flipping tires, go out for a hike—whatever it is, stay active, and as always stay JYM Army Strong. I'll see you guys soon.
Related Articles

My breakdown of the New Year's Challenge Week 2: Full-Body Supersets

The transcript of my live Facebook video offering details and tips on Week 2 of my Countdown to Strength Challenge

The transcript of my live Facebook session covering Week 4 of the Countdown to Strength Challenge

The transcript of my live session breaking down my three-week strength, muscle, and fat-loss program Full-Body MED Training.
Foundations
Featured Meal Plans
Muscle Hypertrophy: Build Muscle Fast
Rethink Your Rep Range
The Science of Strength Bands
Training
Nutrition
Supplementation
Health